Lokalise for Translation
Lokalise provides tools to automate, integrate, and better manage the translation process.
Platform content that supports our automated API integration with Lokalise:
- Course session content (resources, menu-items, forms, polls, quizzes)
- Course catalog content and application forms
- Track catalog content and application forms
- Profile forms
- Post-registration forms
The general workflow is:
- Send the platform content to Lokalise (REQUIRED)
- Order translation of the content in Lokalise (REQUIRED)
- QA and mark the final translations as "Verified" in Lokalise (OPTIONAL)
- Mark the final translations as "Reviewed" in Lokalise (REQUIRED), which automatically triggers importing of the final translations back into the TechChange platform
See below for step-by-step instructions on how to do so. Note that Step 1 will be different depending on the type of platform content to send to Lokalise, but Steps 2-4 will be the same after that.
1a. Send the Course content to Lokalise
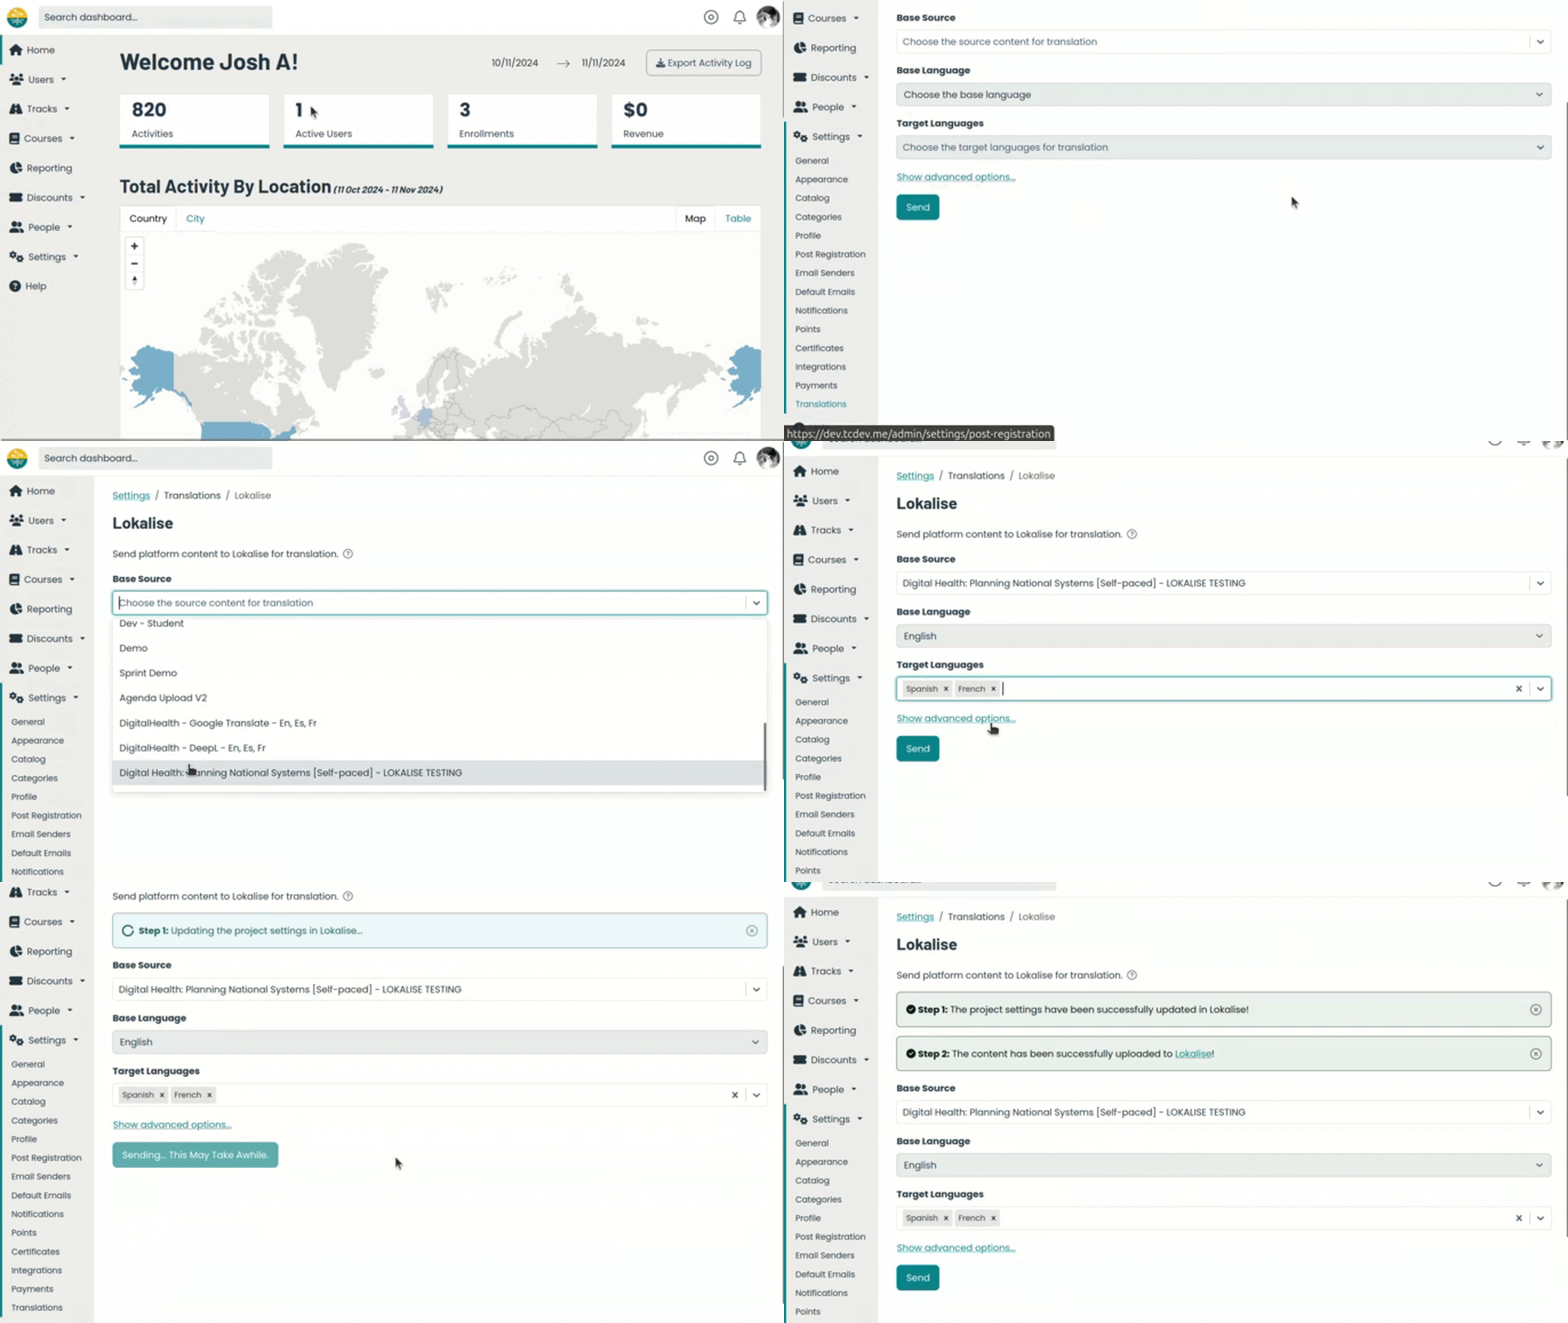
- From the Admin Portal, select the Settings -> Translation menu item
- Choose a specific course as the Base Source
- The Base Language will automatically update for you to match the selected course
- Choose the Target Languages for translation
- If needed, choose the advanced options settings
- Include previous translations -> If you previously translated this course content on the TechChange platform, enable this setting to also send the pre-existing data in the target languages to Lokalise.
- Replace modified content -> If you're re-sending course content that is already present in Lokalise, enable this setting to replace it with the most recent data.
- Click the Send button to upload the course content to Lokalise
- Click on the project link to open the Lokalise page for the course content
This includes:
- The course catalog content
- The course application form
- The resources, menu-items, forms, polls, and quizzes for each session of the course
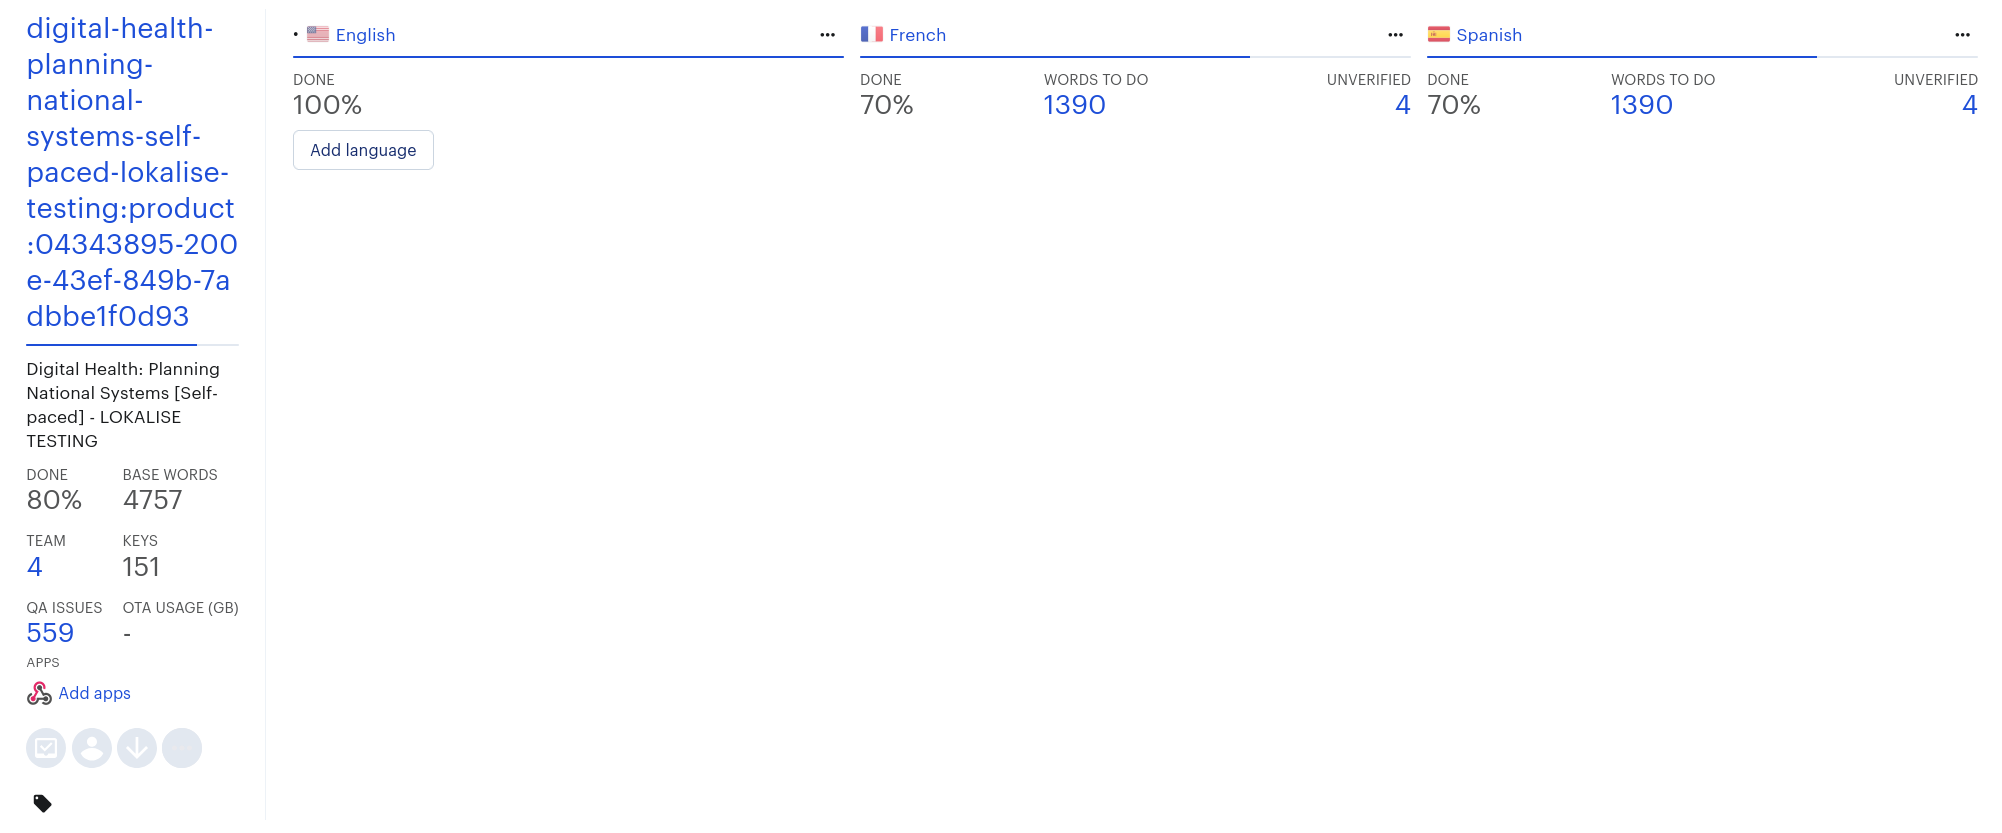
Once the content has been sent to Lokalise, you'll be able to find it under a project named [TITLE]:product:[ID], where TITLE and ID are from the course on the TechChange platform:
1b. Send the Track content to Lokalise
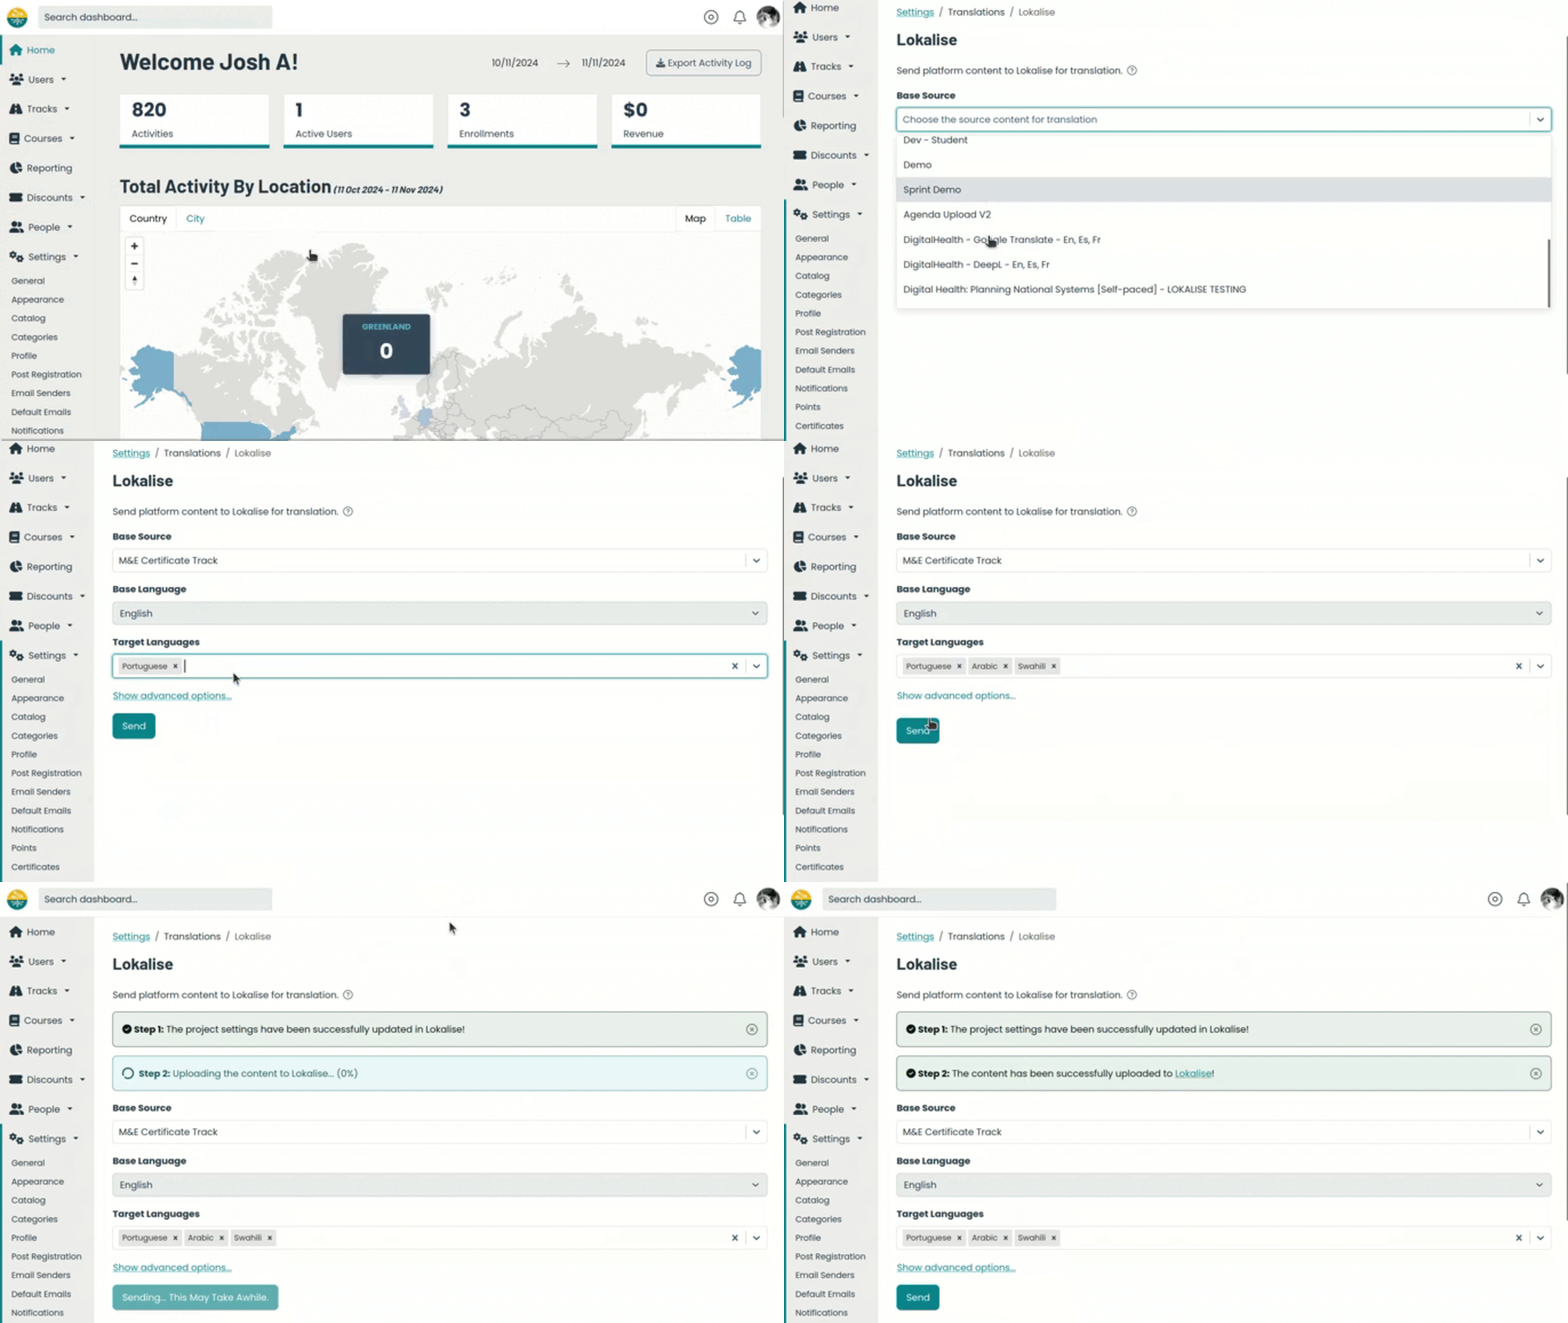
- From the Admin Portal, select the Settings -> Translation menu item
- Choose a specific track as the Base Source
- The Base Language will automatically update for you to match the selected track
- Choose the Target Languages for translation
- If needed, choose the advanced options settings
- Include previous translations -> If you previously translated this track content on the TechChange platform, enable this setting to also send the pre-existing data in the target languages to Lokalise.
- Replace modified content -> If you're re-sending track content that is already present in Lokalise, enable this setting to replace it with the most recent data.
- Click the Send button to upload the track content to Lokalise
- Click on the project link to open the Lokalise page for the track content
This includes:
- The track catalog content
- The track application form
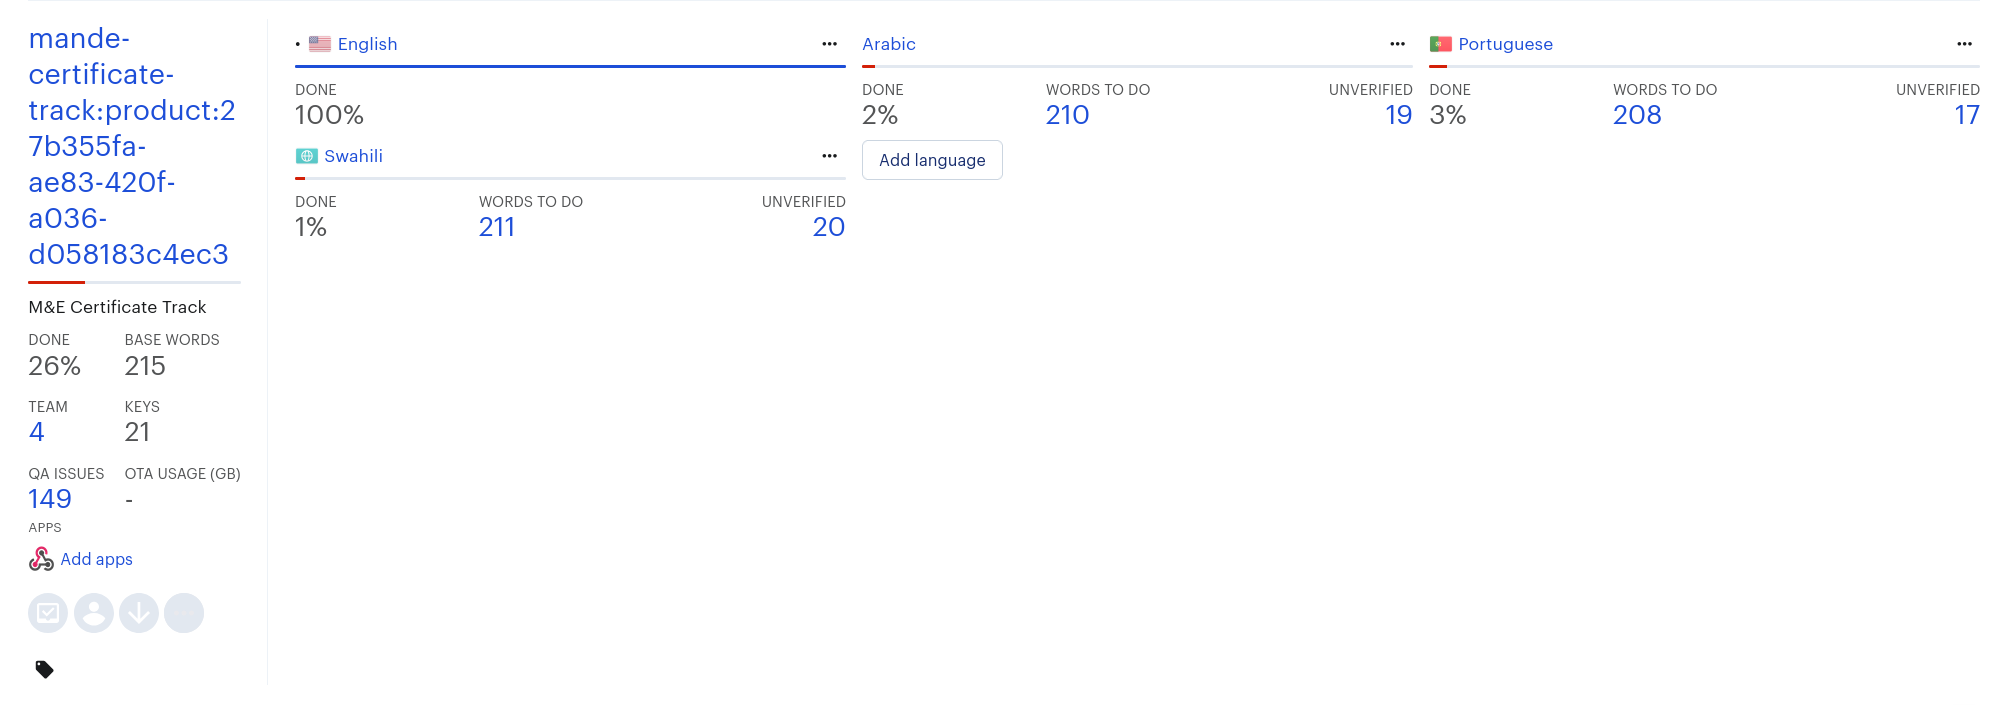
Once the content has been sent to Lokalise, you'll be able to find it under a project named [TITLE]:product:[ID], where TITLE and ID are from the track on the TechChange platform:
1c. Send the Profile Form or Post-Registration Form to Lokalise
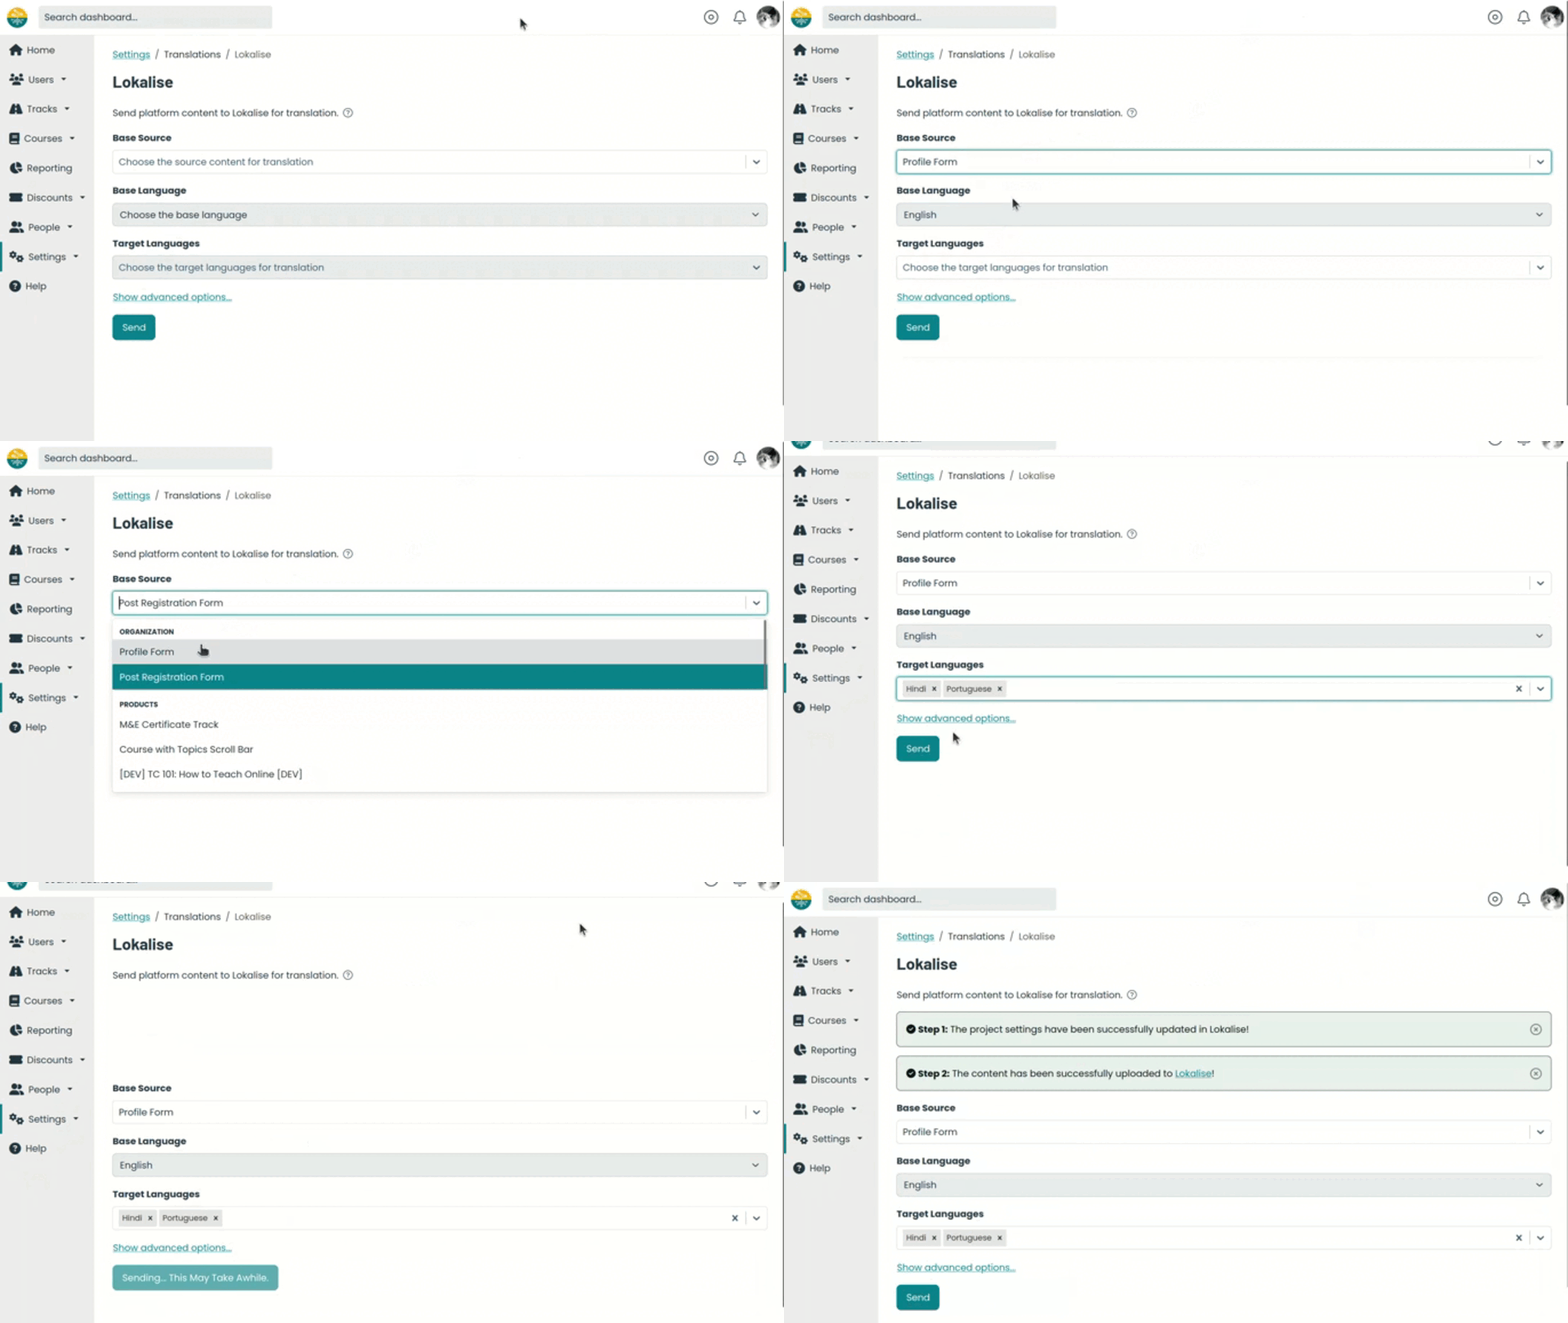
- From the Admin Portal, select the Settings -> Translation menu item.
- Choose a specific form as the Base Source.
- The Base Language will automatically update for you.
- Choose the Target Languages for translation.
- If needed, choose the advanced options settings
- Include previous translations -> If you previously translated this form content on the TechChange platform, enable this setting to also send the pre-existing data in the target languages to Lokalise.
- Replace modified content -> If you're re-sending form content that is already present in Lokalise, enable this setting to replace it with the most recent data.
- Click the Send button to upload the form content to Lokalise
- Click on the project link to open the Lokalise page for the form content
Once the content has been sent to Lokalise, you'll be able to find it under a project named [TITLE]:organization:[ID], where TITLE and ID are from the organization on the TechChange platform:

2. Order translation of content inside Lokalise
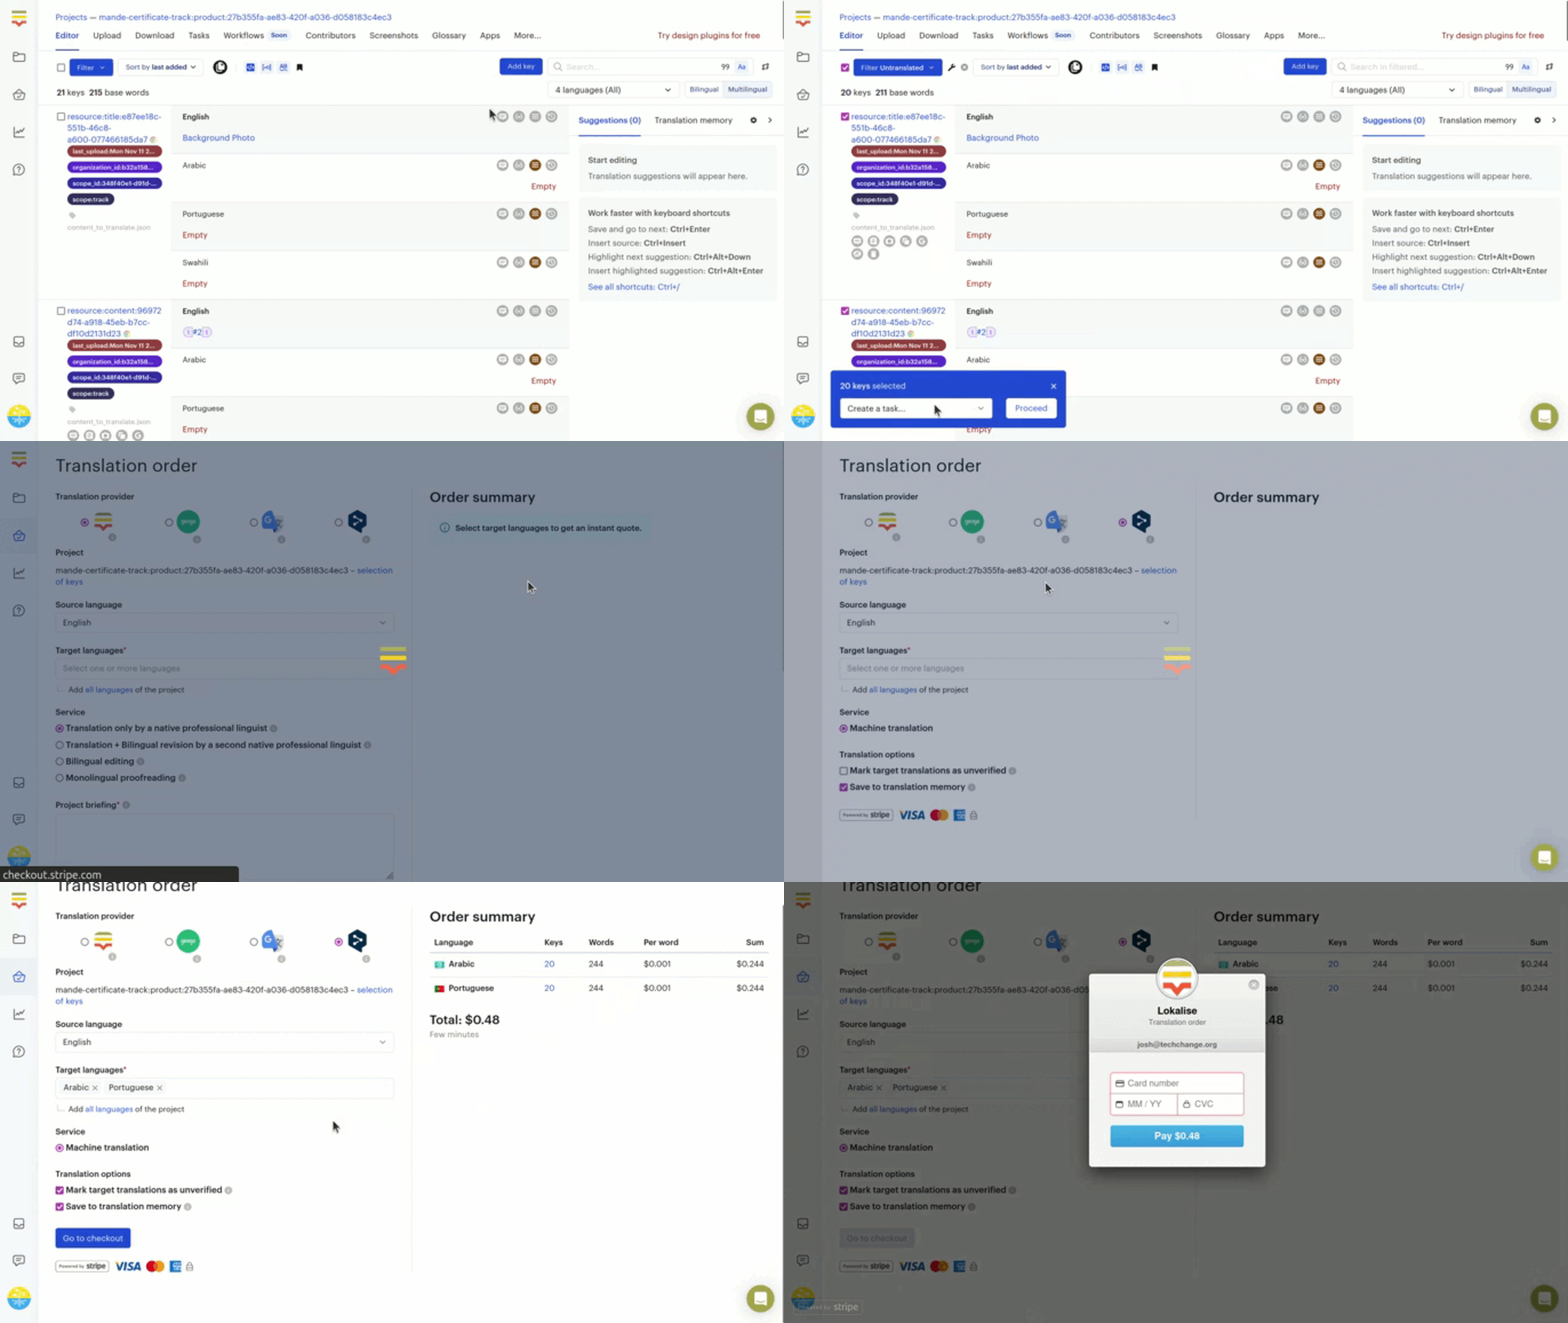
- Navigate to the project in Lokalise
- Select the keys to translate using the Filter dropdown and the checkboxes on the left-side of the page
- You should probably filter the keys to only include the Untranslated results
- A blue popup menu should open in the bottom-left corner of the page, choose the Order translation... action and click the Proceed button
- A confirmation modal should open, click the Confirm button to continue
- Fill out the Translation order form
- Choose the Translation provider, ranked from most expensive to least expensive:
- Lokalise -> Uses native professional human translators. Translations in over 90 languages are available. They offer 4 different services: translation, review, bilingual editing, and proofreading.
- Gengo -> Uses a network of over 18,000 human translators, which are based around the world and in every timezone. Translations in over 35 languages are available. They offer 2 different services: native speaker and professional translator.
- Google -> Uses machine translation (MT). Translations are available in over 100 languages. Final translations should be checked to ensure that they sound native and fit the required context.
- DeepL -> Uses machine translation (MT). Translations are available in 24 languages. The result can sound more native than some other MT options. You may want to regularly go back and forth between DeepL and Google MT to see which option better suits your needs.
- Choose the Source language, which most likely will be the base language for the content
- Choose the Target languages
- Choose the Service and other settings related to the selected Translation provider
- If using machine translation (MT), we recommend "marking target translations as unverified"
- Choose the Translation provider, ranked from most expensive to least expensive:
- Verify the languages, total cost, and estimated delivery time in the Order summary section
- Confirm billing and credit card information in the Checkout modal, click the Pay $x.xx button
3. Verify the final translations inside Lokalise
Lokalise offers a number of features related to quality assurance (QA) and verification.
If you're not doing the QA and verification yourself, then you'll need to invite others to contribute to the project.
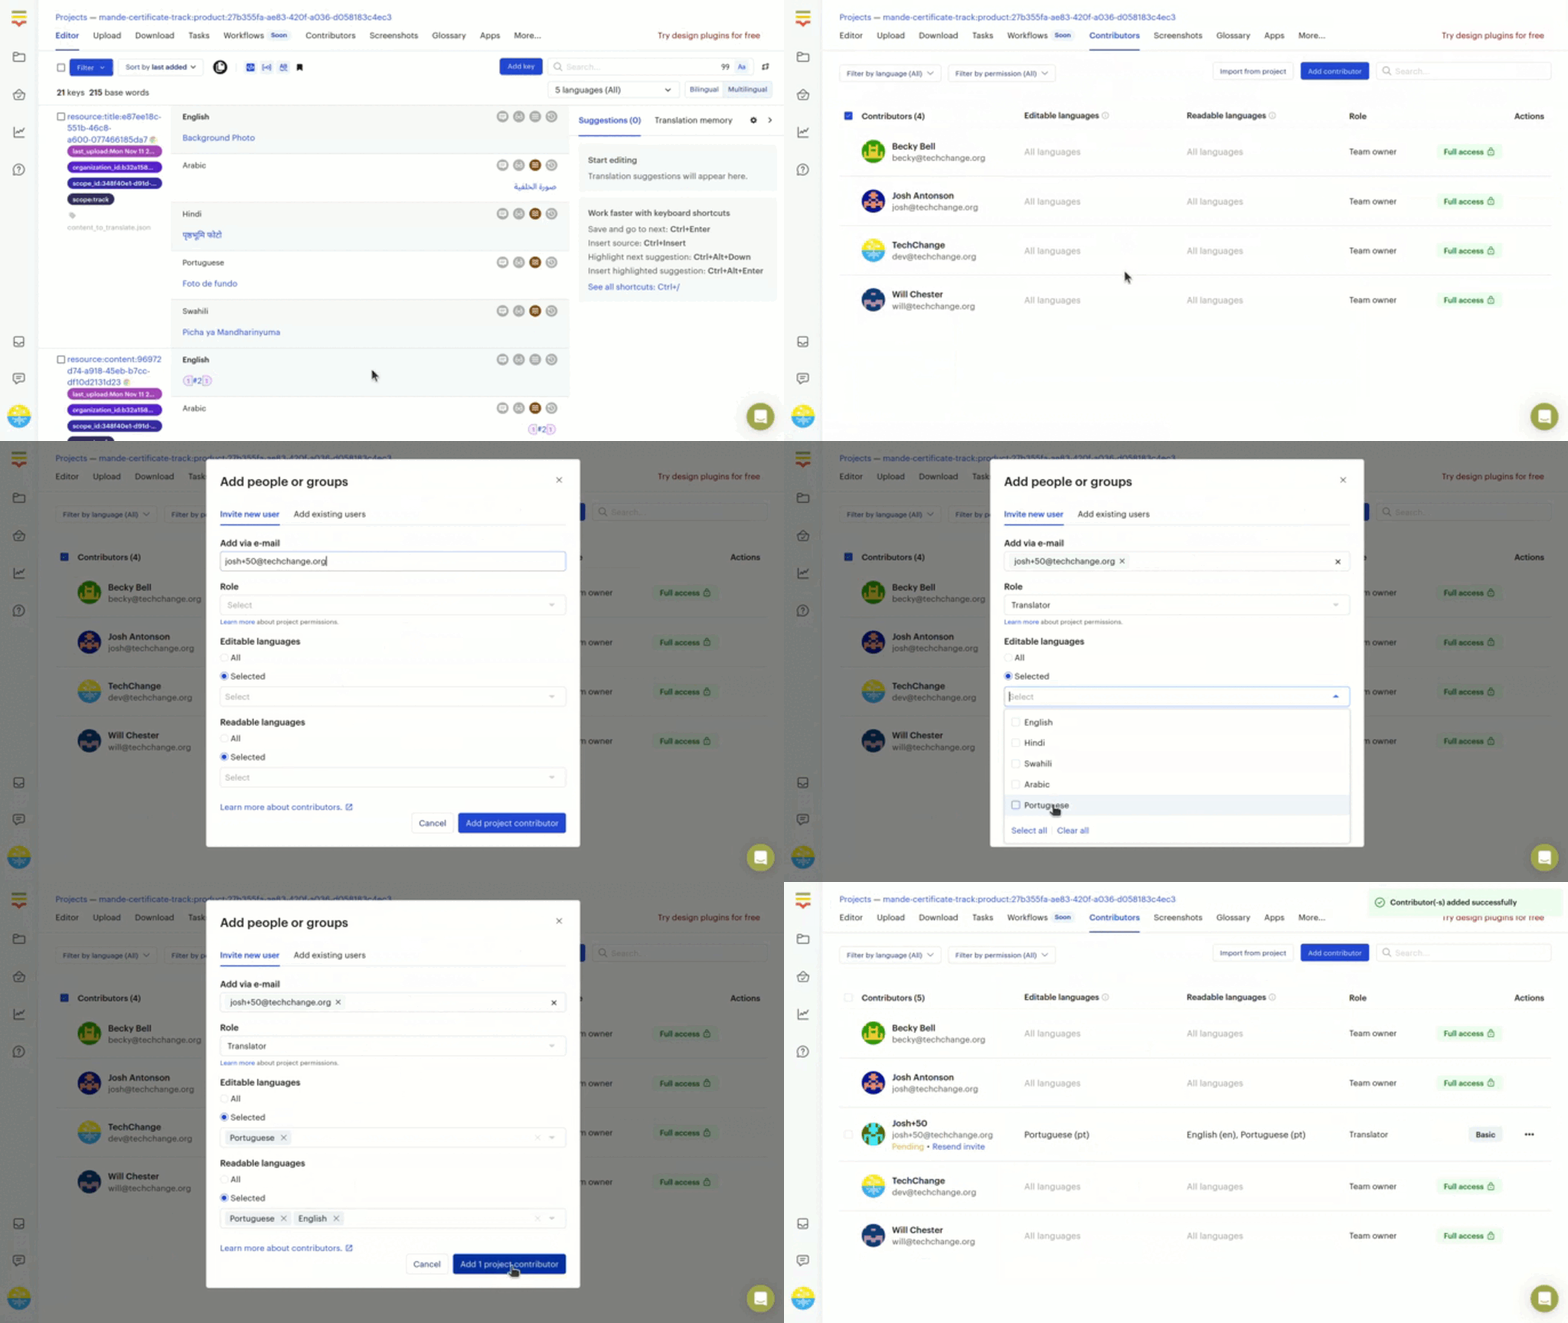
- Navigate to the project in Lokalise
- Click on the Contributors tab in the navigation menu
- Click the Add contributor button at the top of the Contributors list
- Fill out the Invite new user form
- Enter their email addresses in the Add via e-mail input
- Choose their Role
- We recommend selecting the Translator option, as this will give them the ability to modify the final translations and then mark it as "verified" when they're done
- Choose their Editable languages, i.e. what final translations they can modify
- Choose their Readable languages
- We recommend including all of the editable languages, as well as the base language
- Click the Add project contributor button to invite them to the Lokalise project
- Verify the details for the new contributor in the Contributors list
The new contributor should receive an email inviting them to join the Lokalise project.
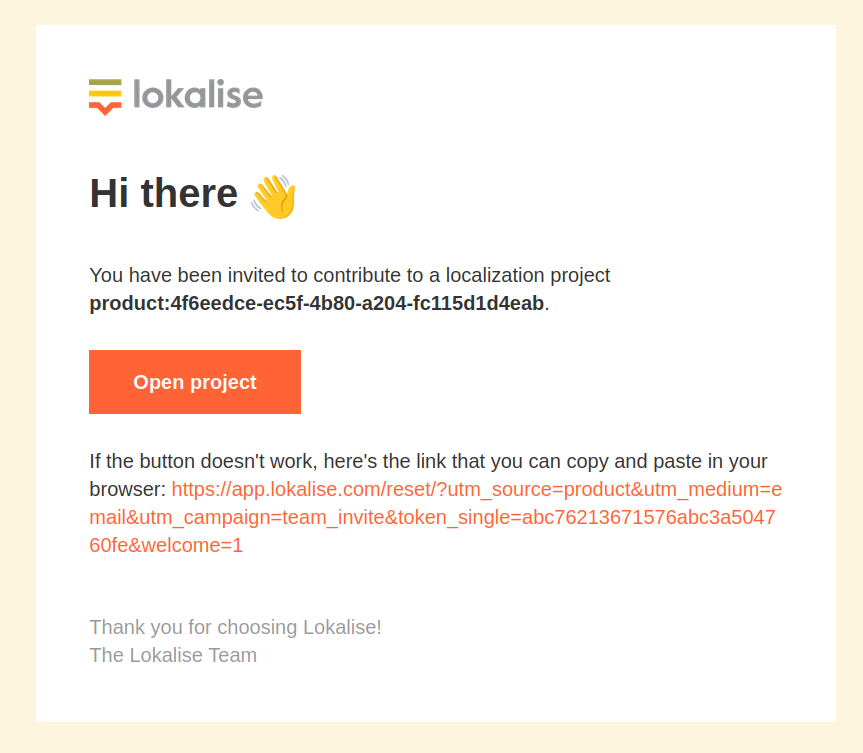
Once they accept the email invite and create a new Lokalise account, they'll be able to navigate to the Lokalise project, and start QA of the final translations.
There are 2 different ways to mark the final translations for the keys as "verified", either one-at-a-time or in bulk.
- To mark a single key as "verified", click the Mark as Verified icon button.
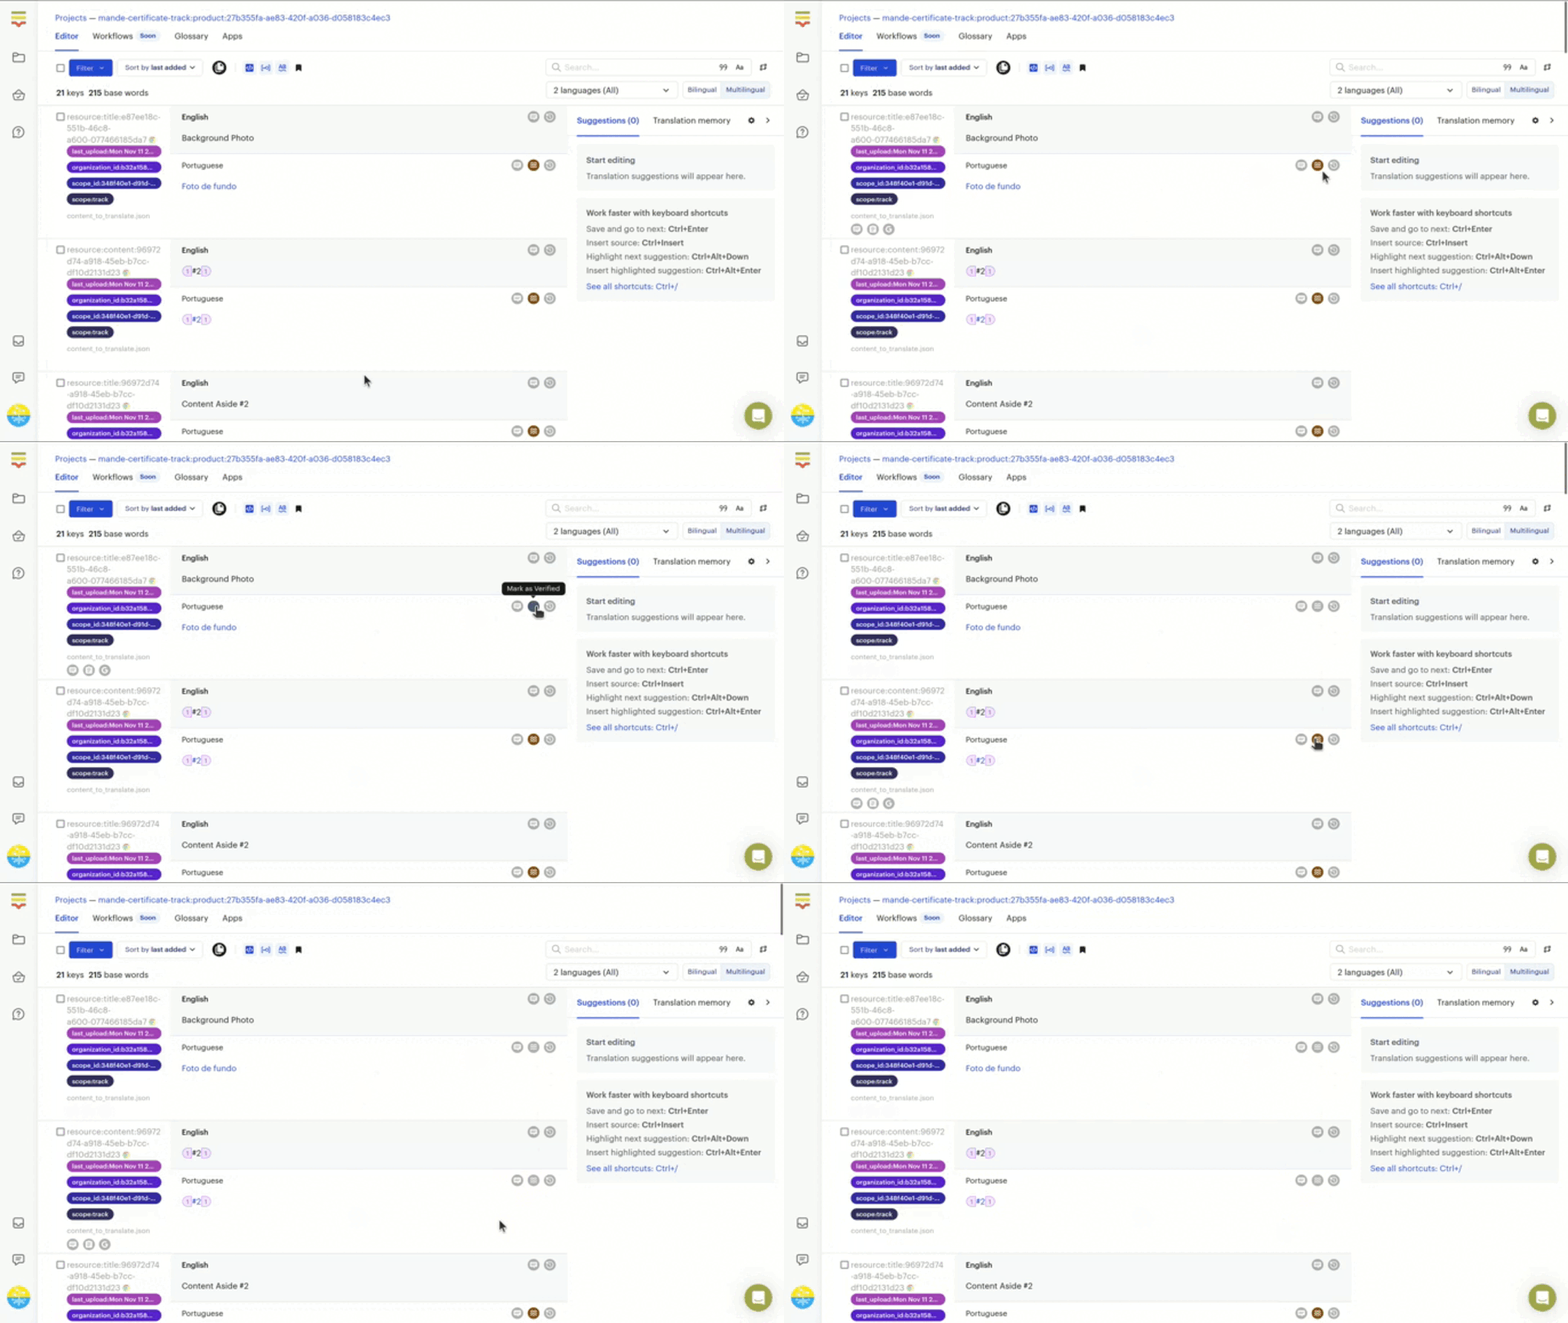
- To mark multiple keys as "verified" in bulk, select the keys using the Filter dropdown and the checkboxes on the left-side of the page
- A blue popup menu should open in the bottom-left corner of the page, choose the Unverified: set/unset... action and click the Unset button
- A confirmation modal for "Mark X keys as verified?" should open, click the Confirm button to continue
- A green success alert should popup saying "X translations were set as verified"

Note: Alternatively, you can invite the contributor(s) to the Lokalise project using the Reviewer role, which will also grant them permission to mark the final translations as "reviewed" (Step 4) when they're done. This automatically triggers importing of the final translations back into the TechChange platform, so just be careful when choosing between Translator and Reviewer.
4. Review the final translations inside Lokalise
In order to import the final translations back into the TechChange platform, you'll need to mark them as "reviewed".
As soon as you mark the final translations as "reviewed" inside Lokalise, it'll automatically be imported back into the TechChange platform. Depending on the size of the final translations, the import can take up to a few minutes to process.
There are 2 different ways to mark the final translations for the keys as "reviewed", either one-at-a-time or in bulk.
- To mark a single key as "reviewed", click the Mark as Reviewed icon button.
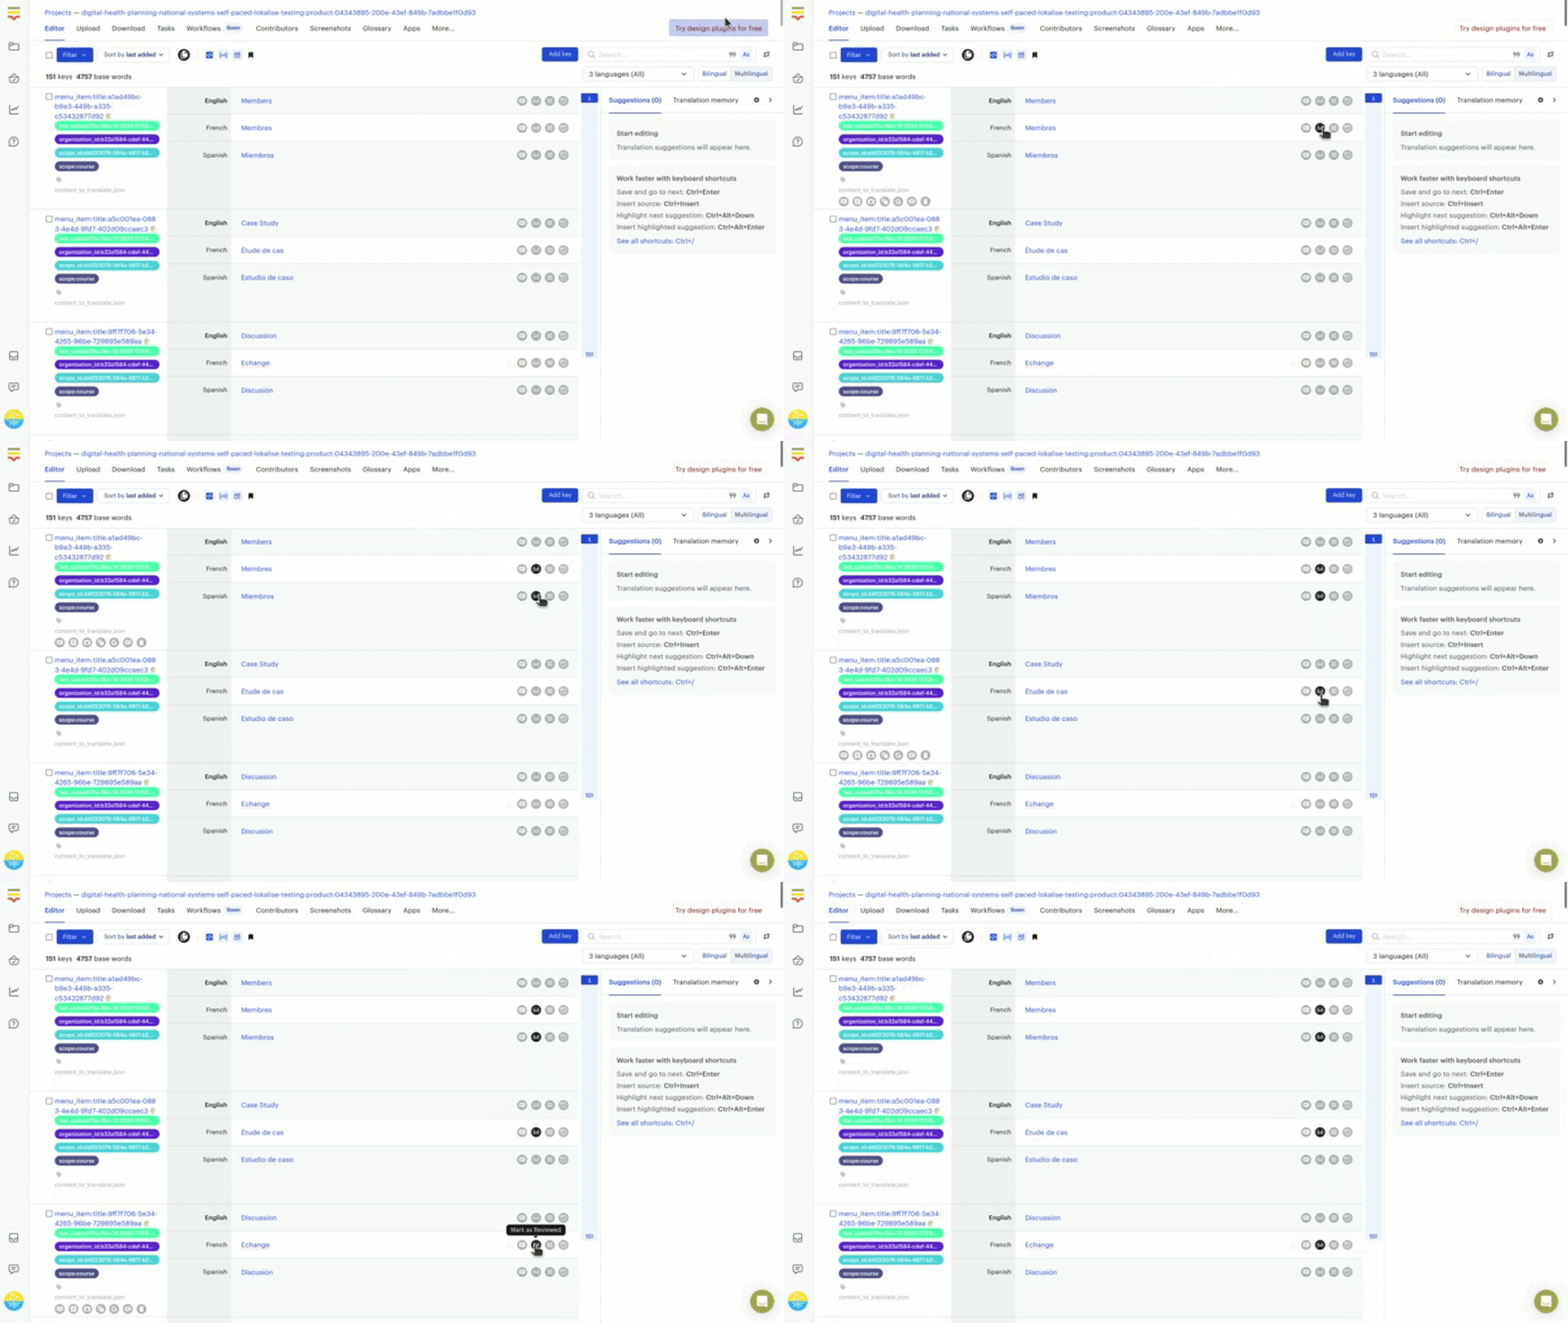
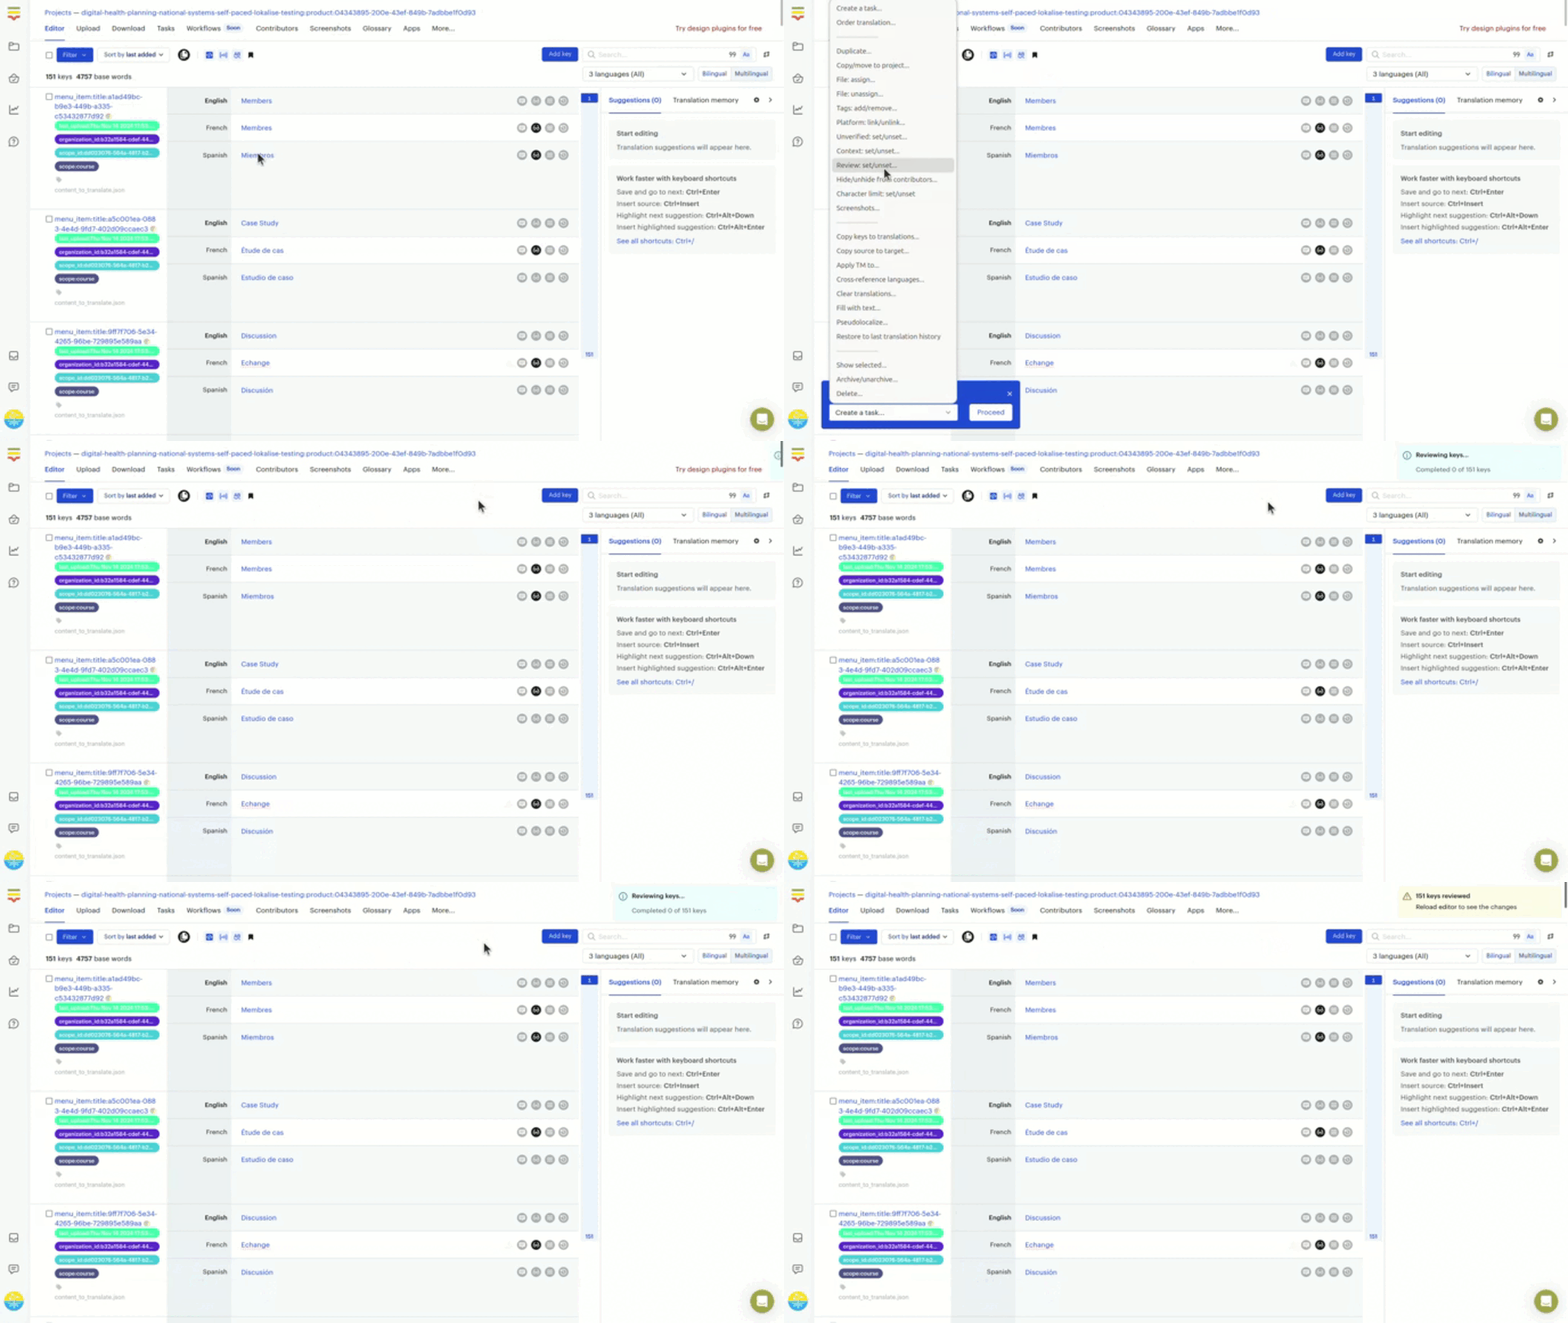
- To mark multiple keys as "reviewed" in bulk, select the keys using the Filter dropdown and the checkboxes on the left-side of the page
- A blue popup menu should open in the bottom-left corner of the page, choose the Review: set/unset... action and click the Set button
- A confirmation modal for "Mark X keys as reviewed?" should open, click the Confirm button to continue
- A green success alert should popup saying "X keys reviewed"
Learn More
- Lokalise offers a free suite of on-demand courses at Lokalise Academy related to how to plan, manage, and deliver localization projects
- Lokalise offers a playlist of YouTube videos at Lokalise Tutorials related to their various features
Translation Memory (TM)
Lokalise offers a powerful built-in translation memory that's shared across all team projects and members. Anything entered in the editor or uploaded by you or your team is automatically saved to the translation memory for future use.
For instance, once a translator completes translating a key from English to French, Lokalise automatically saves this translation to the TM.
By default, each project within a team shares the same translation memory, but this can be adjusted as needed. Admins have the flexibility to create and assign as many memory storages as necessary.
When sending TechChange platform content to Lokalise, we'll automatically pre-translate the data using the TM. For each piece of content, Lokalise searches for a matching entry in the TM. If a 100% match is found, the corresponding translation will be automatically populated for the piece of content, as long as it doesn’t already have a translation.
If you remove a piece of content, the TM will be unaffected. All entries will remain intact. It is only updated when translations are created or edited.
Translation Glossary
- https://lokalise.com/blog/localization-glossary/
- https://docs.lokalise.com/en/articles/1400629-glossary
The Lokalise glossary helps maintain consistency across project translations. Any contributor can add terms to the project glossary. When a term from the glossary is used in the source language translation, it will automatically appear in the editor's inline suggestion box.
Machine translation engines (i.e. Google-Translate or DeepL) do not take the glossary into account. However, Lokalise AI translations will use your glossary entries when applicable.
If you’re creating a professional, human translation order, glossary entries won’t be shared with translators if you choose Gengo as the provider. To ensure translators see glossary entries or translation memory suggestions, please choose Lokalise as the provider.
The glossary is meant for reference, and there’s no option to automatically apply it to translations, without using the Lokalise AI.
You can share the glossary to make it available for other projects within the same Lokalise team.