CSV Exports & Imports for Translation
Platform content that supports the CSV export/import process:
- Course session content (resources, menu-items, forms, polls, quizzes)
- Course catalog content and application forms
- Track catalog content and application forms
- Profile forms
- Post-registration forms
The general workflow is:
- Export the platform content as a CSV file (or a ZIP folder of multiple CSV files)
- Send the CSV file to the 3rd-party translation firm
- They translate the
contentcolumn in the CSV file, while preserving theidandtypecolumns - Receive the translated CSV file from the 3rd-party translation firm
- Import the translated CSV file for the new language
See below for step-by-step instructions on how to do so for each type of platform content.
Translating the Course Session Content
Export Session Resources, Menu-Items, Forms, Polls, Quizzes for Translation
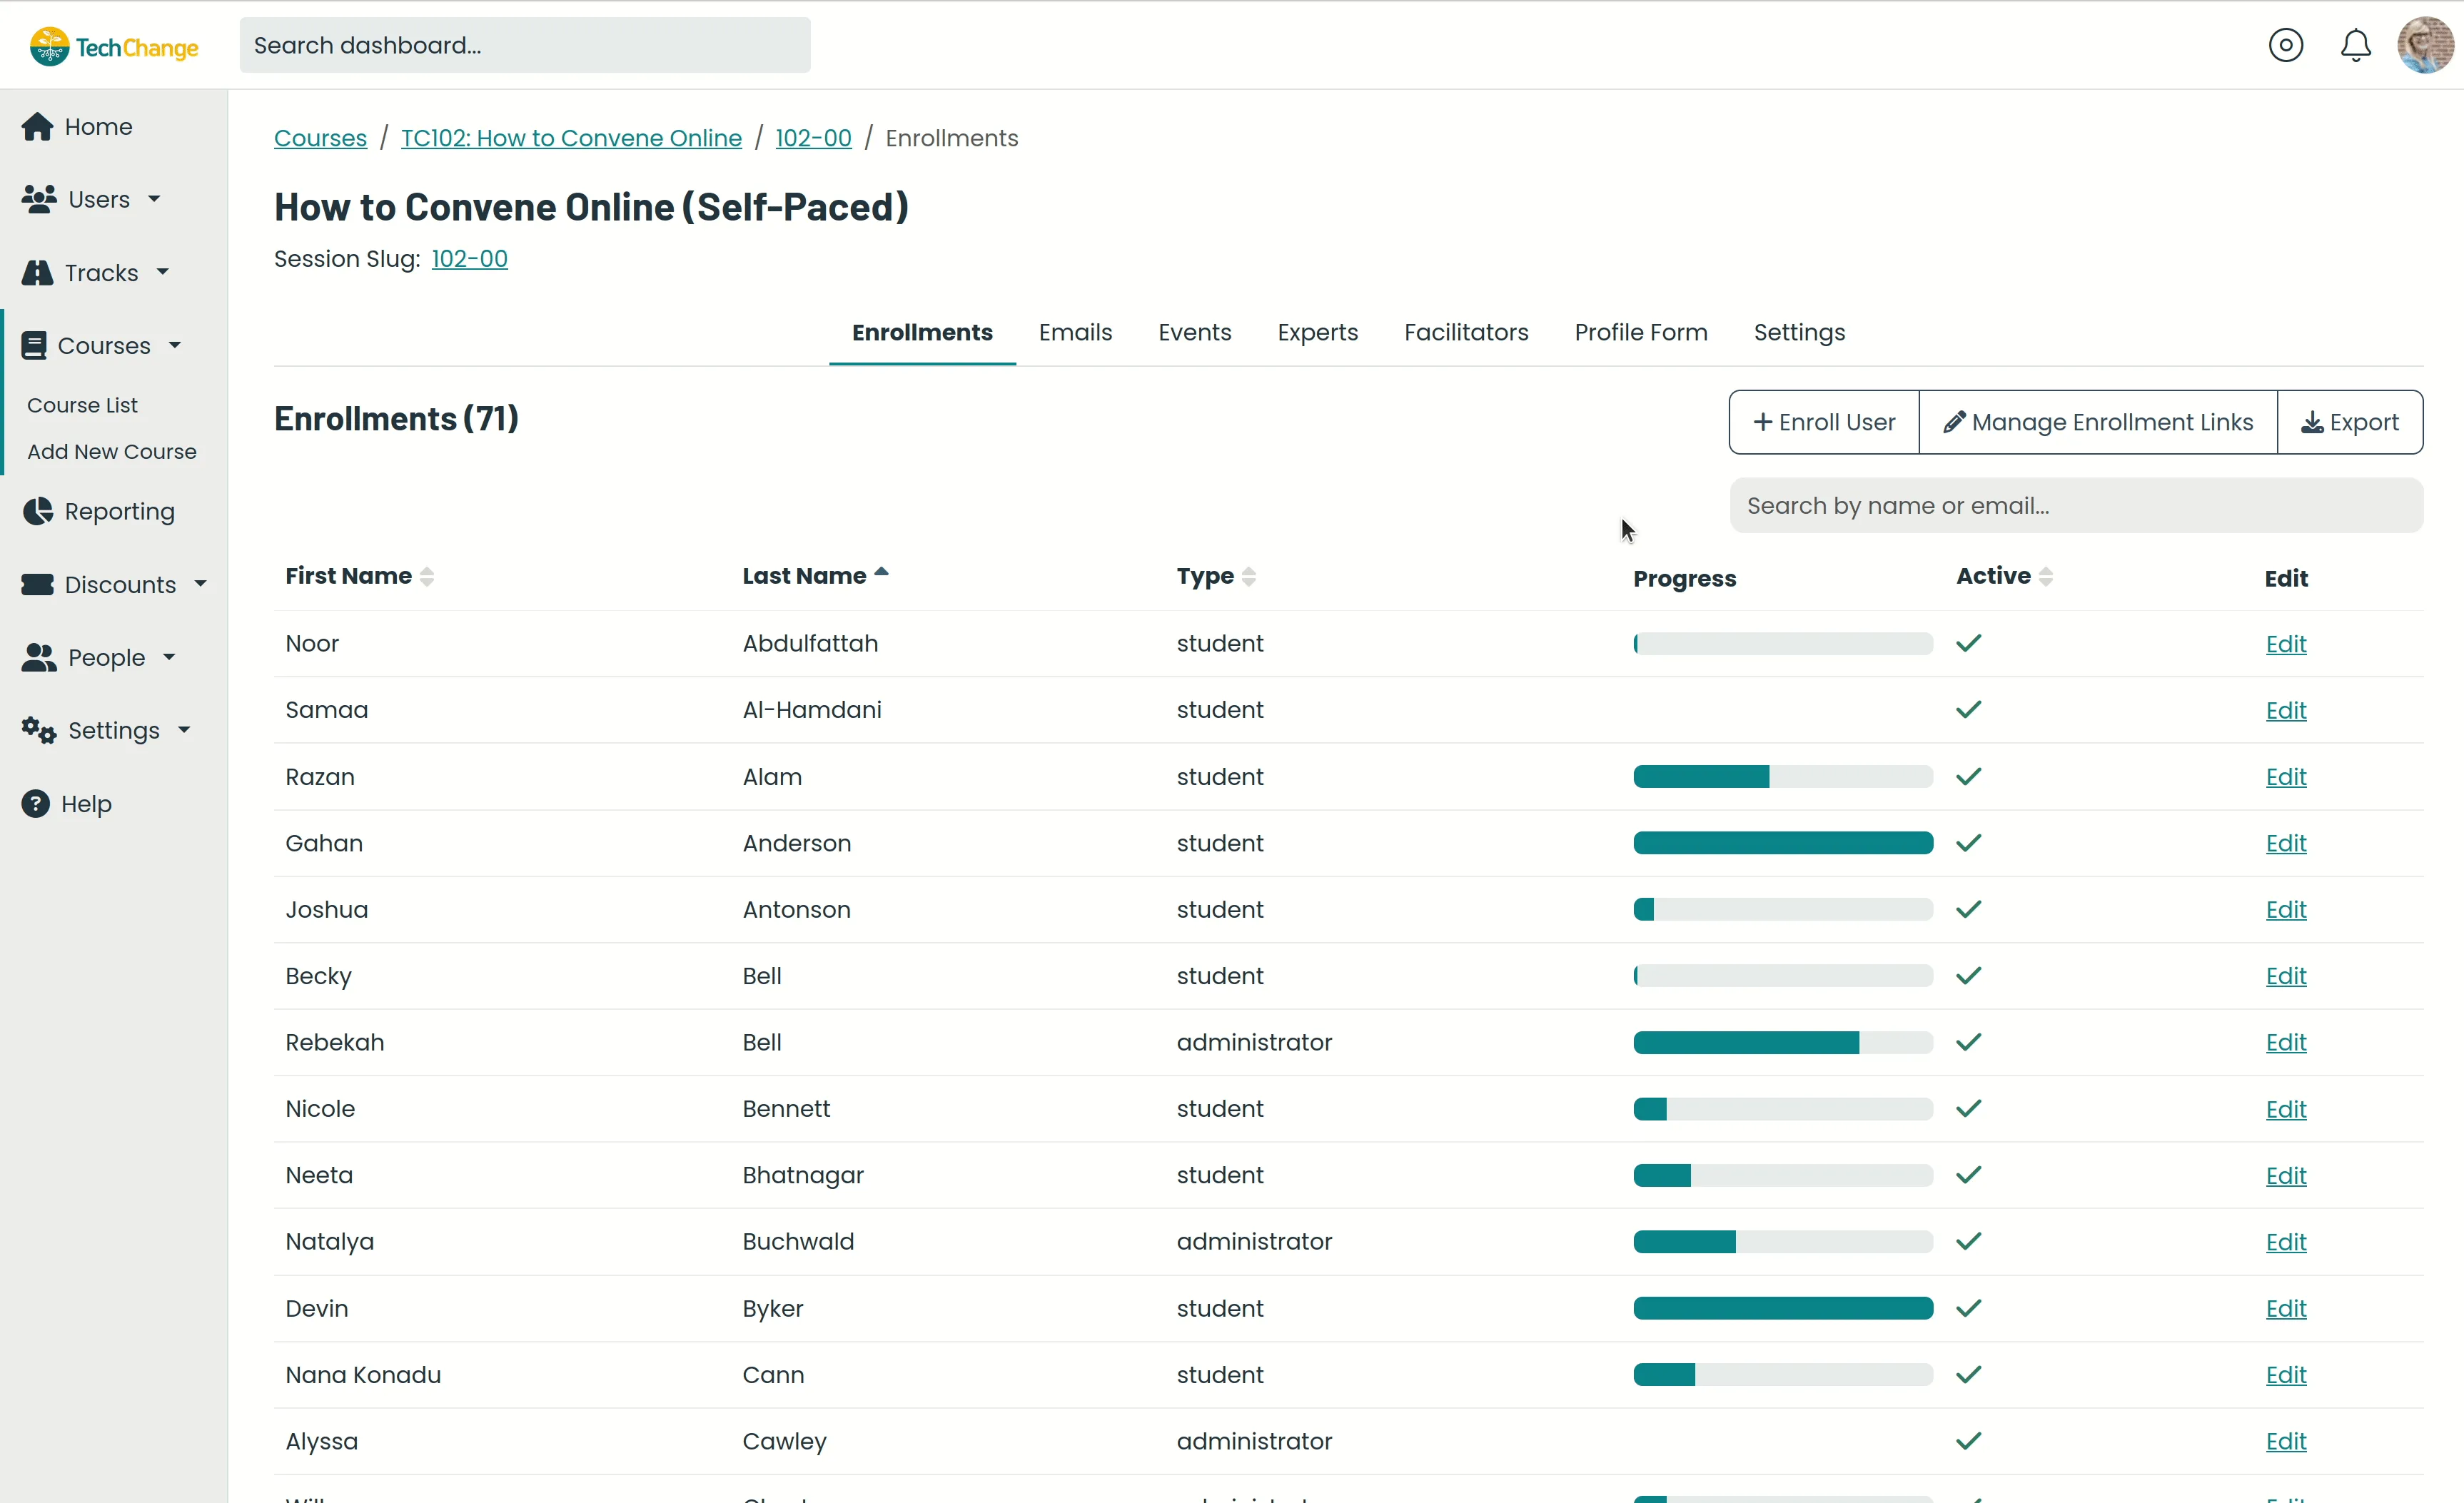
- Navigate to the Admin Portal page for the course session (i.e. the page listing all enrollments)
- Click the Export button on the right side of the page.
- Select the Resource Translations menu item.
- The zip file,
Session_Resource_Translations_MM-DD-YYYY.zip, will be automatically downloaded to your computer. This zip file will contain a copy of each existing translation for the session resources, menu items, forms, polls, and quizzes. Extract the contents of the zip file to a location on your computer and find the CSV for the default language. - The CSV file will contain 3 columns:
id,type, andcontent. The translation team should only make changes to the content column. You CANNOT CHANGE the data in the id and type columns. See example output below:
| id | type | content |
|---|---|---|
| e1d13077-7393-47a9-9011-1998d224fb54 | resource:title | Home |
| ddb47739-4f35-4ea2-94f9-711b8fde7482 | resource:title | Orientation |
| e69f16ac-845f-418b-8f4a-35fd96e8a860 | resource:title | Welcome! |
| e69f16ac-845f-418b-8f4a-35fd96e8a860 | resource:content | <p style="text-align: left;">Hello! Welcome to <strong>TC102: How to Convene Online</strong>. |
| dfda46ee-aa7d-4f81-86c5-0dd1cd9272f8 | menu_item:title | Home |
| f1b355d5-892b-480d-ab7d-4fbd5fb6362b | form:name | Course Introduction Survey |
| 5eb06ddb-6861-4f06-9bfa-0aaa9c64d7f8 | form_section:title | Section #1 |
| 311c43b5-d898-4f50-94a5-6e9096b0d2cb | form_field:title | Rate your current ability to respond promptly and effectively to challenges that you or participants may encounter while managing an online meeting or workshop. |
Note: After exporting content for translation, DO NOT make any changes to the course content on the platform until the translations have been successfully imported as described below. If you do so, you run the risk of overriding those changes during the import process.
Import Translations for Session Resources, Menu-Items, Forms, Polls, Quizzes
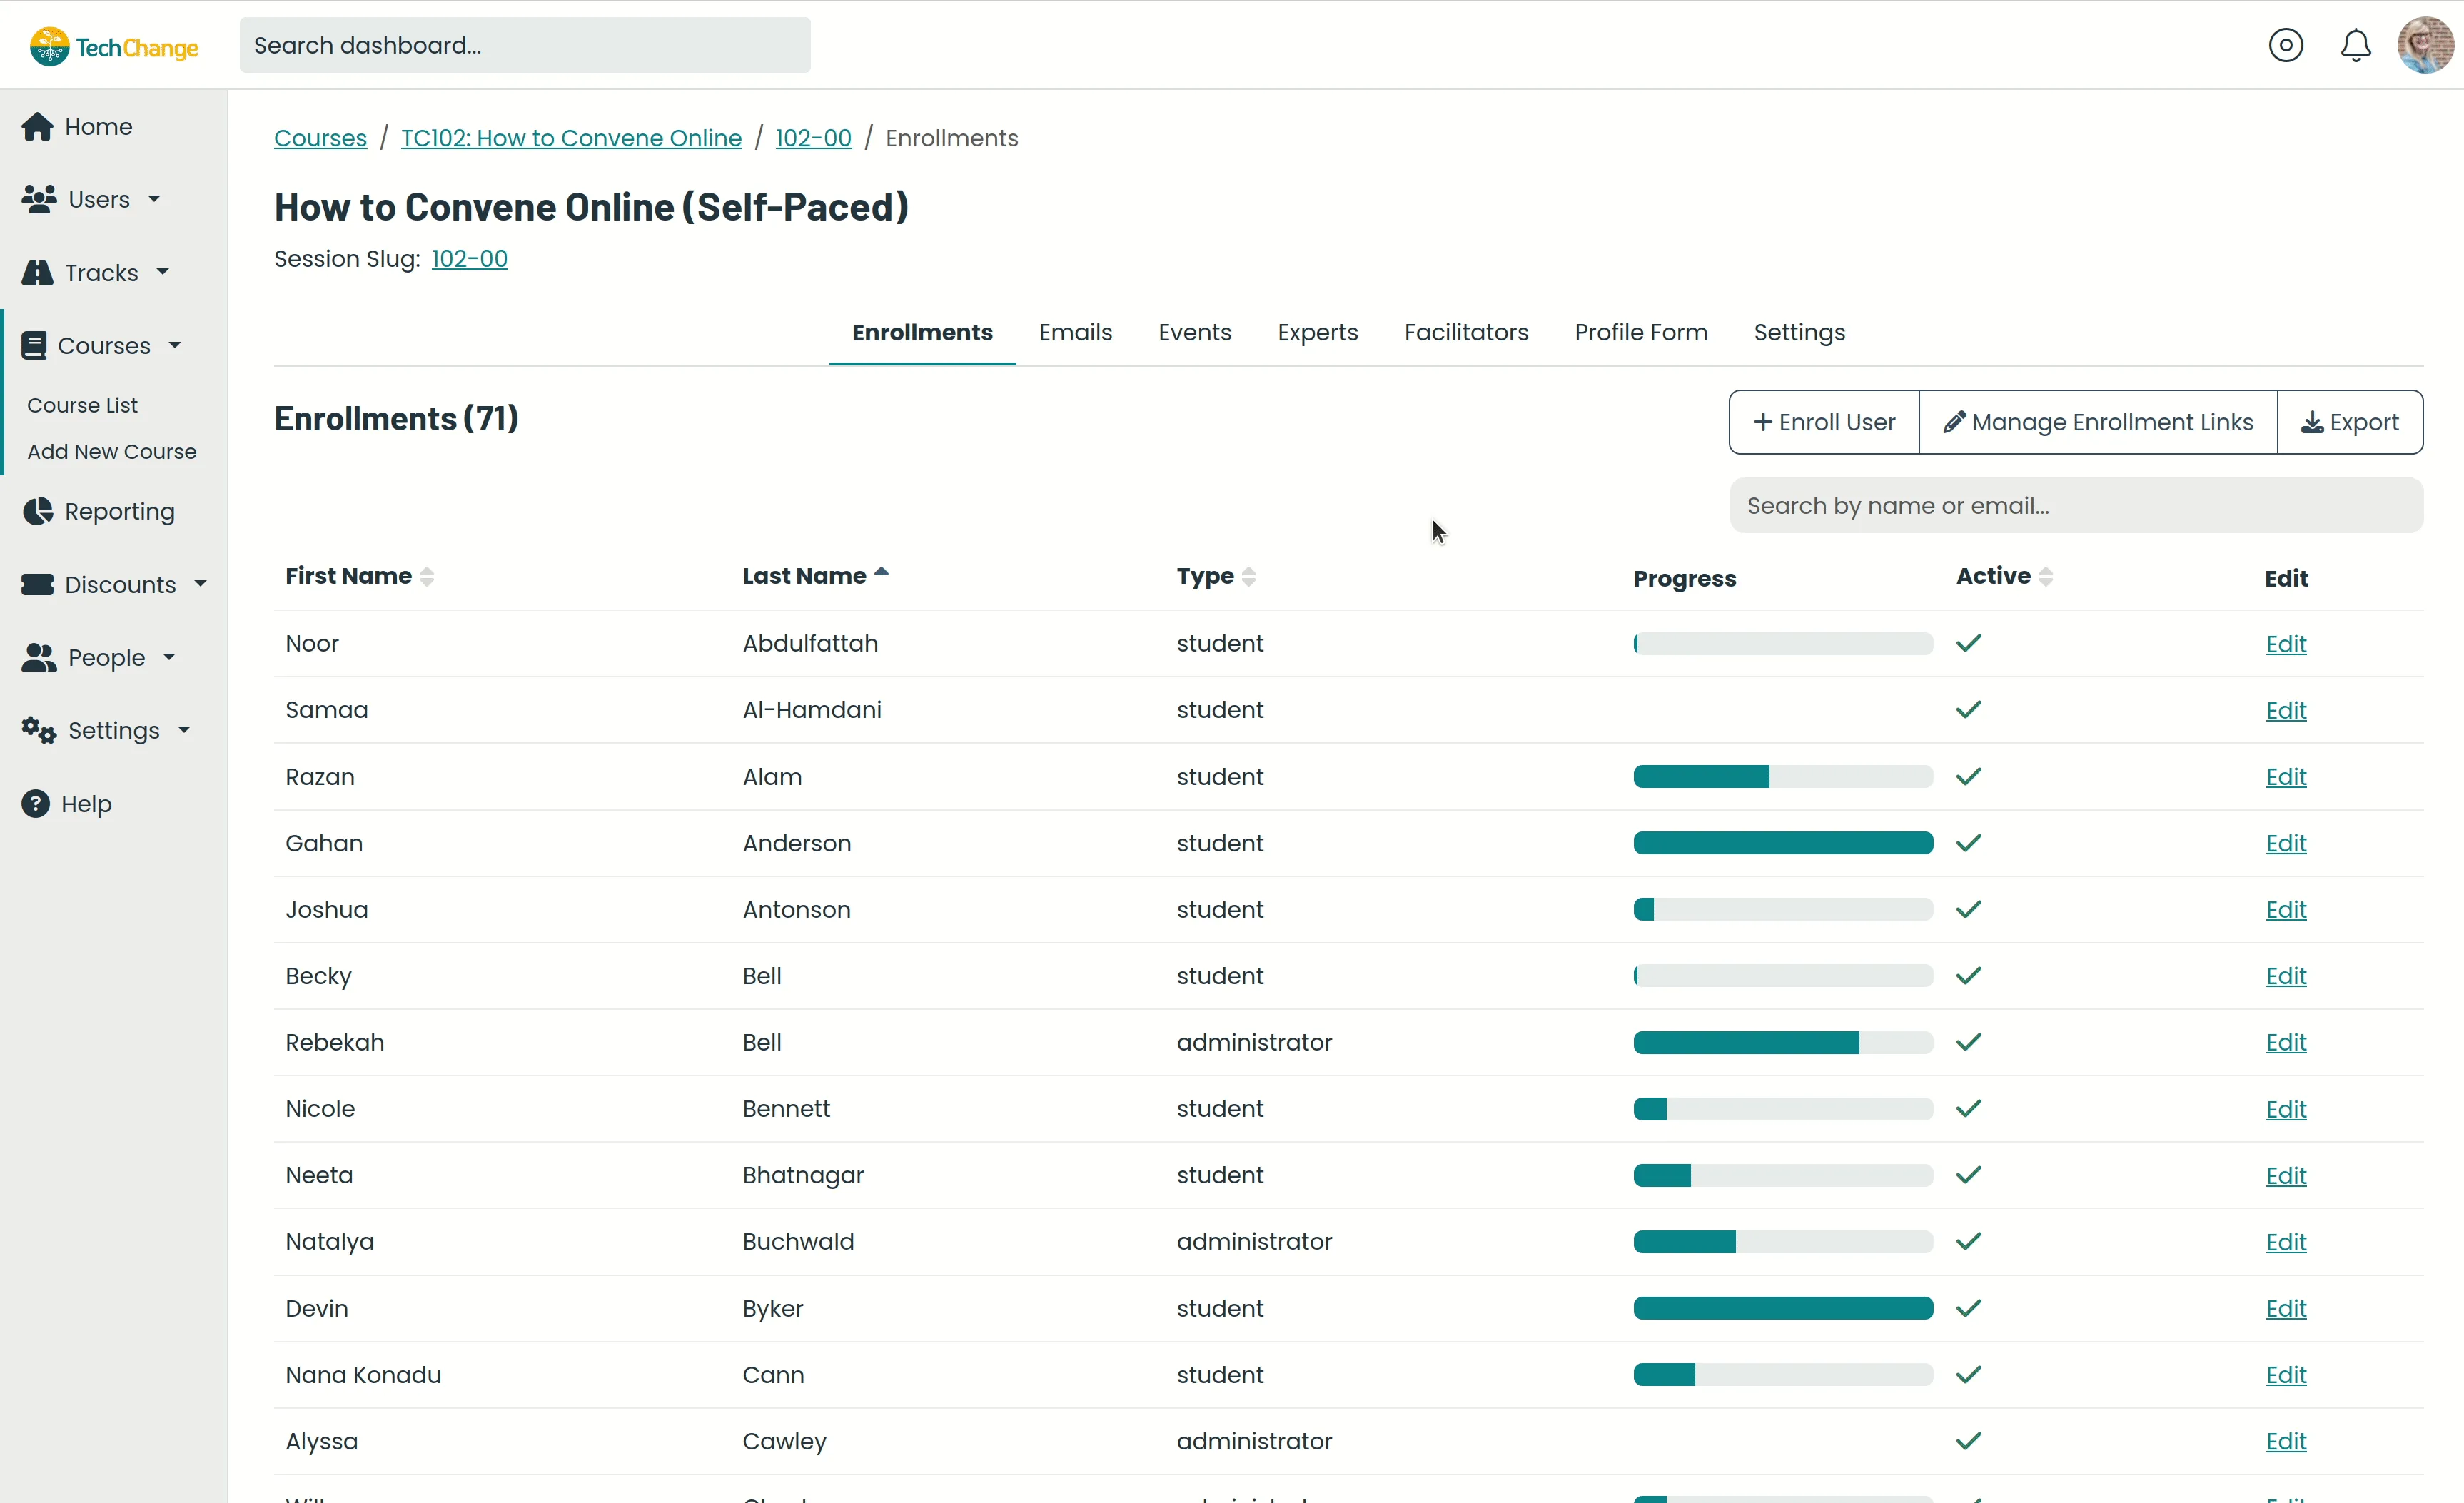
- After the CSV file has been updated to include the translated data in the
contentcolumn, navigate back to the Admin Portal page for the course session (i.e. the page listing all enrollments). - Click on the Settings tab.
- Scroll down to find the Import Translations section.
- Select the language of your translation from the Language dropdown.
- Click the Browse button.
- Navigate to the updated CSV file in your file browser and click to open.
- Click the Import button.
- Make sure your platform language is set to the language matching the imported translation and navigate to the course session. You should see the translated content.
Translating the Course Catalog Content
Export Catalog Content, Application Form for Translation
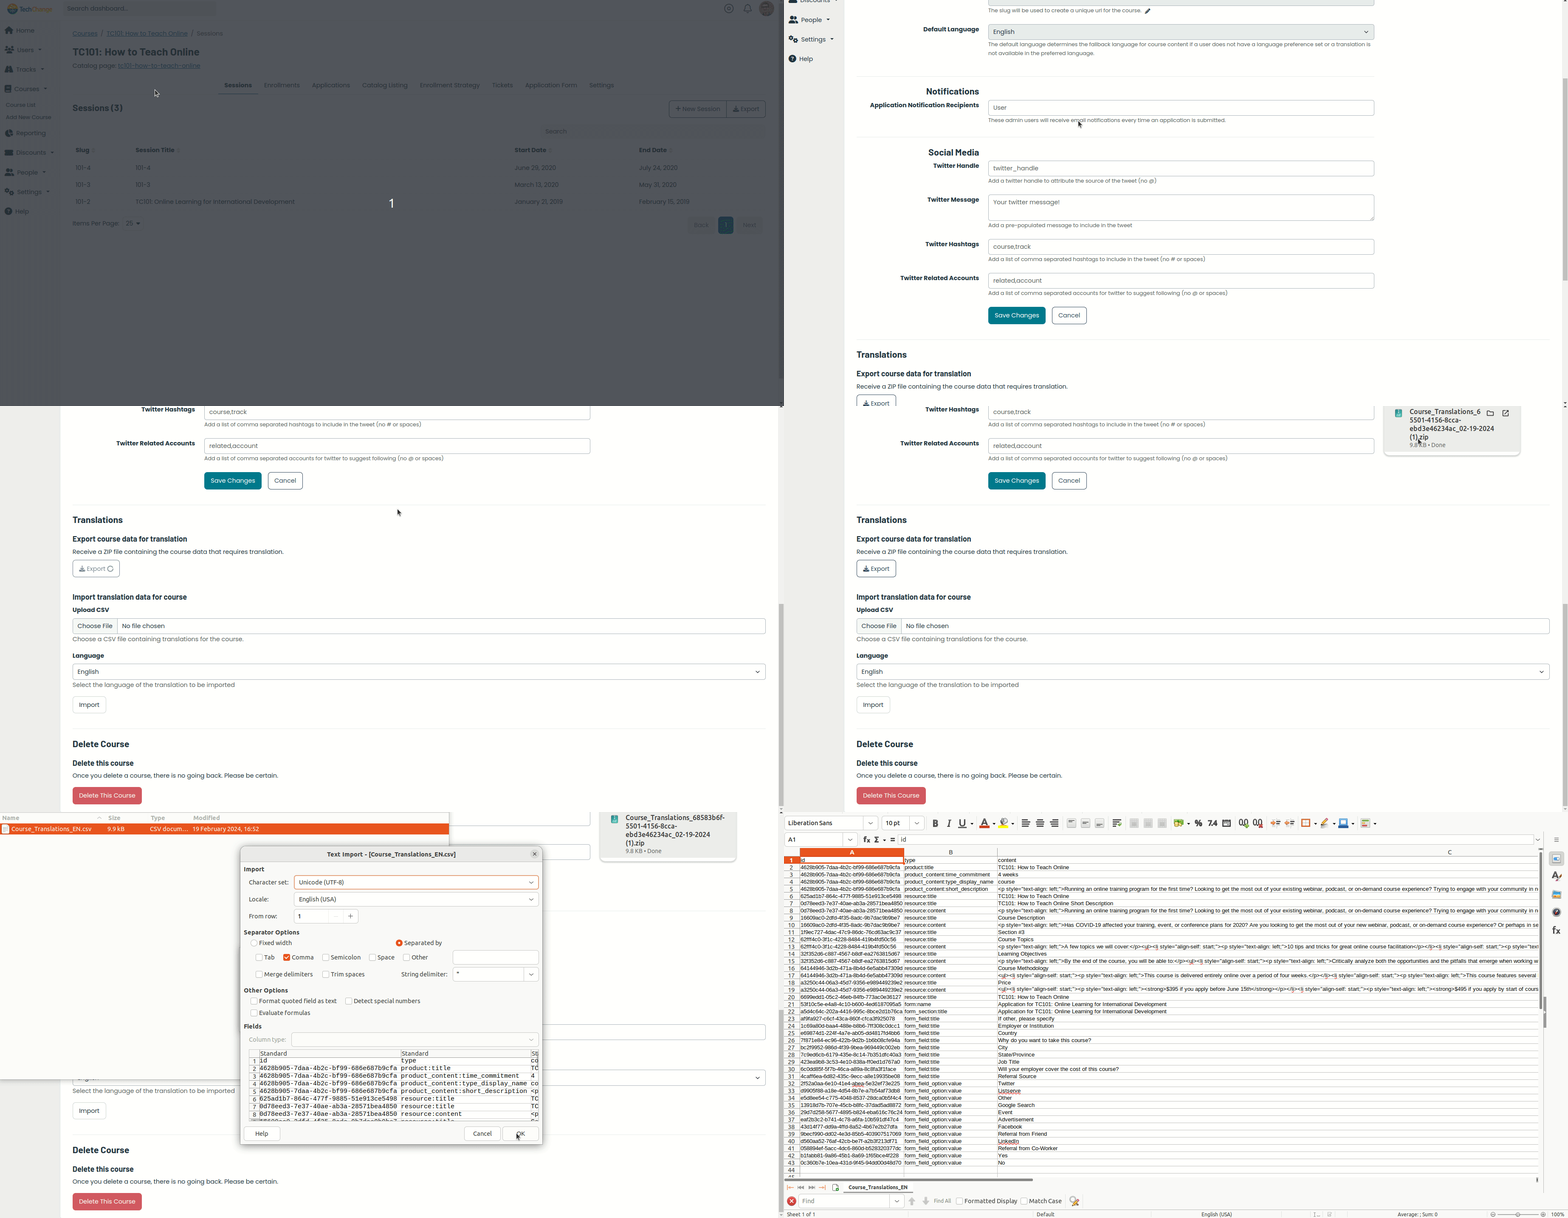
- Navigate to the Admin Portal page for the course (i.e. the page listing all course sessions)
- Click on the Settings tab.
- Scroll down to find the Translations -> Export course data for translation section.
- Click the Export button.
- The zip file,
Course_Translations_MM-DD-YYYY.zip, will be automatically downloaded to your computer. This zip file will contain a copy of each existing translation for the course details, catalog listing, and application form. Extract the contents of the zip file to a location on your computer and find the CSV for the default language. - The CSV file will contain 3 columns:
id,type, andcontent. The translation team should only make changes to thecontentcolumn. You CANNOT CHANGE the data in theidandtypecolumns. See example output below:
| id | type | content |
|---|---|---|
| 9f04e1dd-eda6-4739-823f-41a19a588fa5 | product:title | TC102: How to Convene Online |
| 9f04e1dd-eda6-4739-823f-41a19a588fa5 | product:short_description | <p>Welcome to <em>TC102: How to Convene Online</em>! |
| 9f04e1dd-eda6-4739-823f-41a19a588fa5 | product:time_commitment | 12-15 hours (3-5 hours without activities) |
| b3a7d7b0-1ba8-4e06-9594-a4f20aea8e56 | resource:title | TC102: How to Convene Online |
| 45cbf7ff-46f6-4b60-b9ca-deccffc4ad37 | resource:title | TC102: How to Convene Online Short Description |
| 45cbf7ff-46f6-4b60-b9ca-deccffc4ad37 | resource:content | <p style="text-align: left;">Running an online training program for the first time? Looking to get the most out of your existing webinar, podcast, or on-demand course experience? Trying to engage with your community in new ways through the power of technology? This four-week facilitated online course will provide you with the pedagogical insights, technical knowledge, and industry connections to improve your approach to learning and teaching online. </p> |
| f1b355d5-892b-480d-ab7d-4fbd5fb6362b | form:name | Application for TC102: How to Convene Online |
| 5eb06ddb-6861-4f06-9bfa-0aaa9c64d7f8 | form_section:title | Application for TC102: How to Convene Online |
| 311c43b5-d898-4f50-94a5-6e9096b0d2cb | form_field:title | Rate your current ability to respond promptly and effectively to challenges that you or participants may encounter while managing an online meeting or workshop. |
Note: After exporting content for translation, DO NOT make any changes to the course content on the platform until the translations have been successfully imported as described below. If you do so, you run the risk of overriding those changes during the import process.
Import Translations for Catalog Content, Application Form
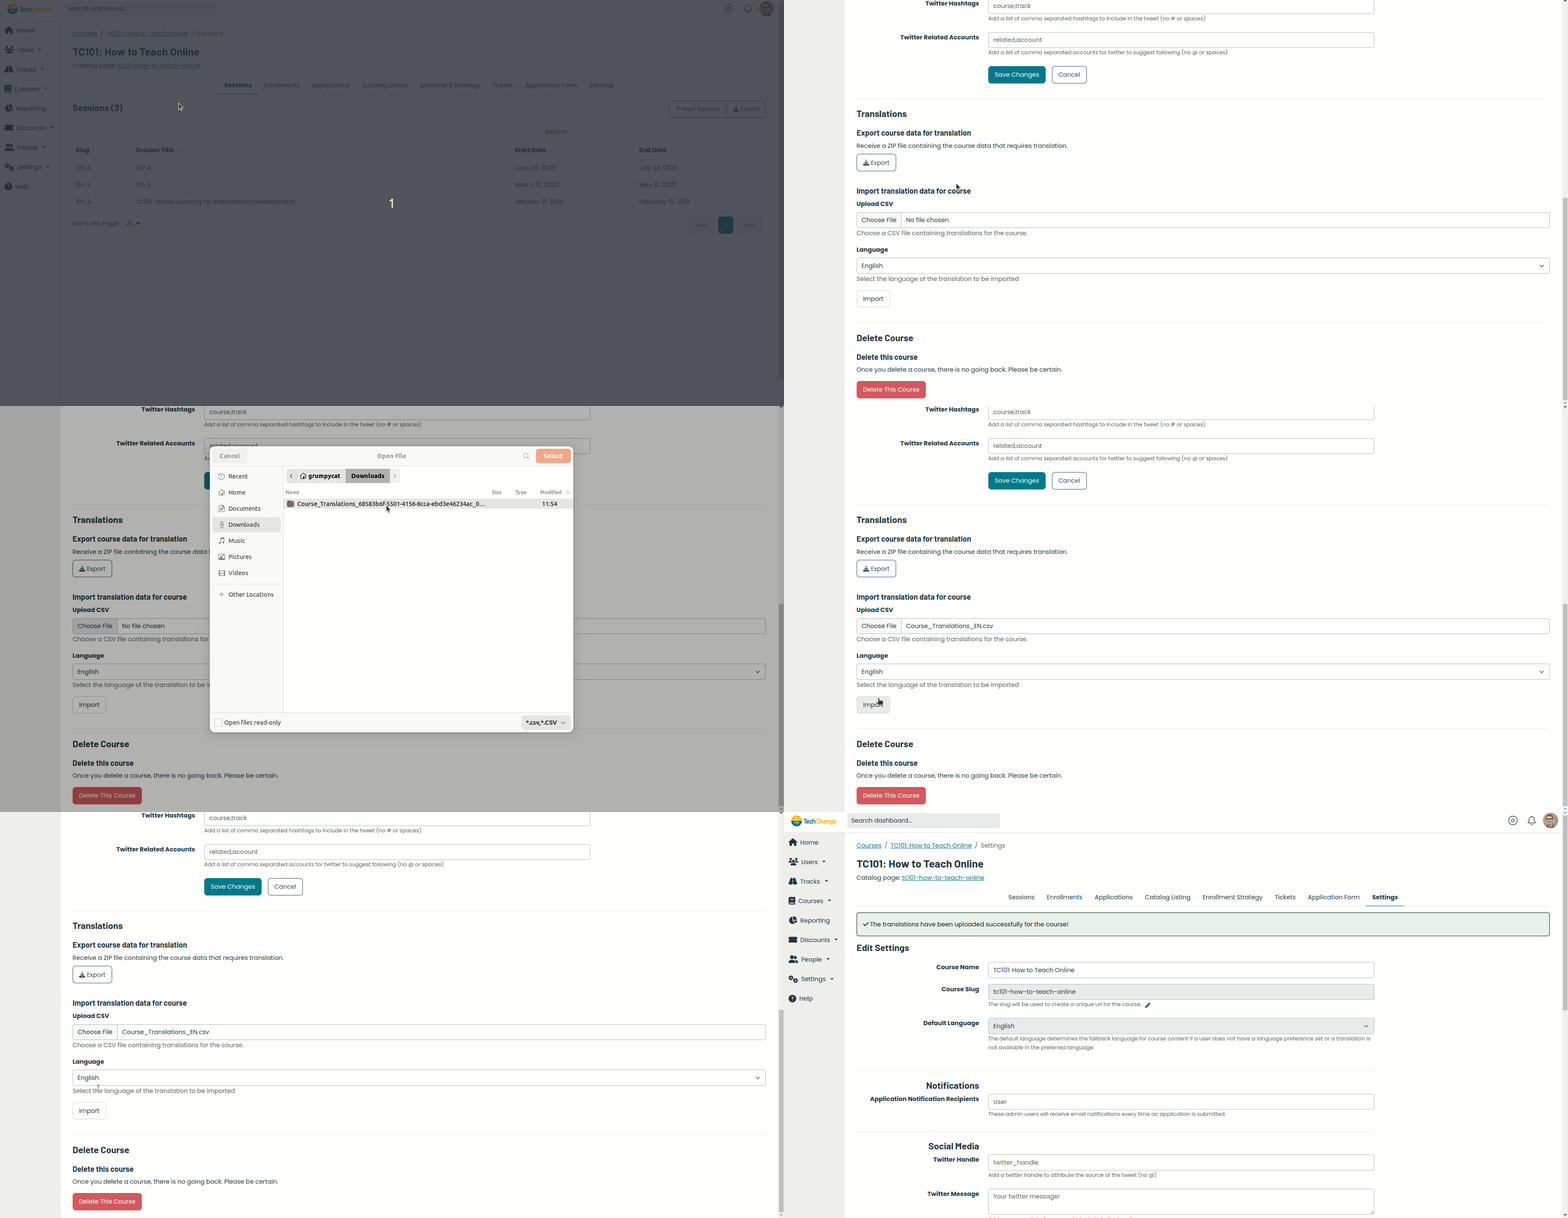
- After the CSV file has been updated to include the translated data for the
contentcolumn, navigate back to the Admin Portal page for the course (i.e. the page listing all course sessions). - Click on the Settings tab.
- Scroll down to find the Translations -> Import translation data for course section.
- Select the language of your translation from the Language dropdown.
- Click the Browse button.
- Navigate to the updated CSV file in your file browser and click to open.
- Click the Import button.
- Make sure your platform language is set to the language matching the imported translation and navigate to the catalog listing page. You should see the translated content.
Translating the Track Catalog Content
Export Catalog Content, Application Form for Translation
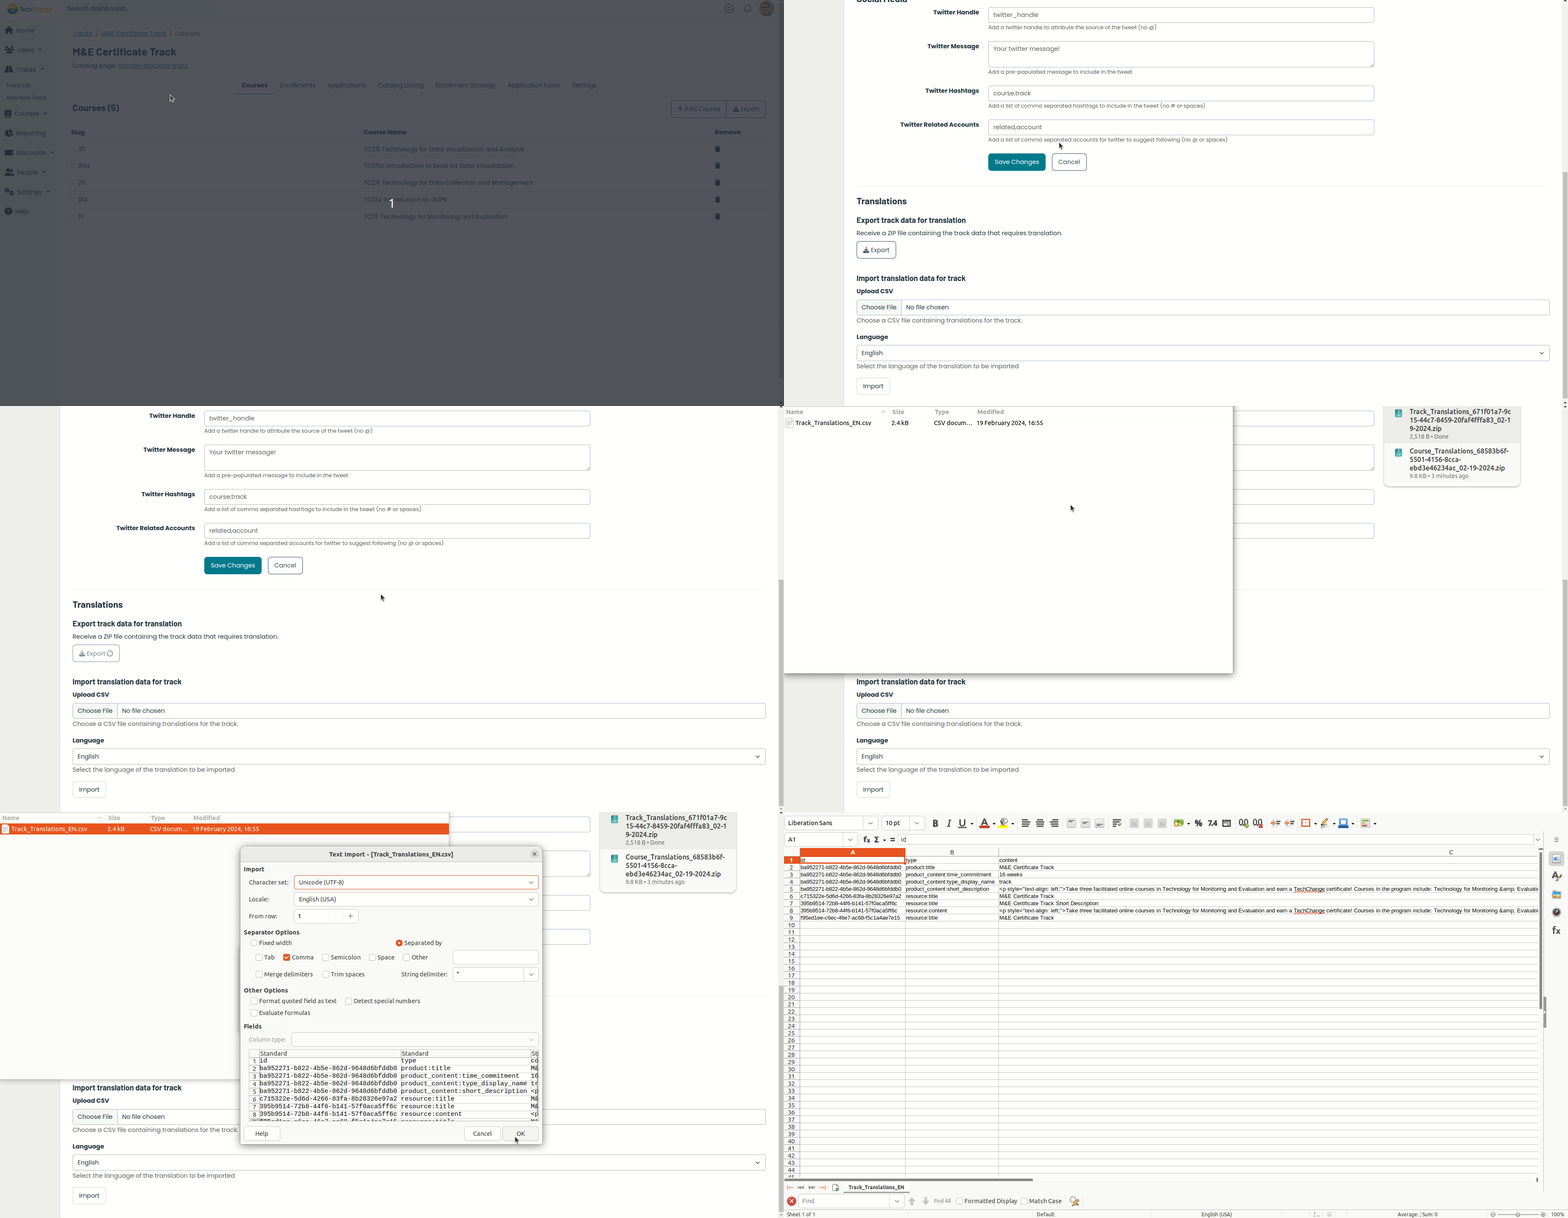
- Navigate to the Admin Portal page for the track (i.e. the page listing all courses for the track)
- Click on the Settings tab.
- Scroll down to find the Translations - Export track data for translation section.
- Click the Export button.
- The zip file,
Track_Translations_MM-DD-YYYY.zip, will be automatically downloaded to your computer. This zip file will contain a copy of each existing translation for the track details, catalog content, and application form. Extract the contents of the zip file to a location on your computer and find the CSV for the default language. - The CSV file will contain 3 columns:
id,type, andcontent. The translation team should only make changes to thecontentcolumn. You CANNOT CHANGE the data in the id and type columns. See example output below:
| id | type | content |
|---|---|---|
| ba952271-b822-4b5e-862d-9648d6bfddb0 | product:title | M&E Certificate Track |
| ba952271-b822-4b5e-862d-9648d6bfddb0 | product:type_display_name | track |
| ba952271-b822-4b5e-862d-9648d6bfddb0 | product:short_description | <p style="text-align: left;">Take three facilitated online courses in Technology for Monitoring and Evaluation and earn a TechChange certificate!....</p> |
| ed4a960b-a617-43b8-8a28-478f36007b05 | resource:title | M&E Certificate Track |
| 9245d7d7-59d8-4954-9f77-ac5b5b2f552c | resource:title | M&E Certificate Track Short Description |
| 9245d7d7-59d8-4954-9f77-ac5b5b2f552c | resource:content | <p style="text-align: left;">You should join this track!</p> |
| c4f178aa-9c5d-4ab0-9029-3daaa11ca4c0 | form:name | Application for M&E Certificate Track |
| 08d7f6a2-cb19-4168-9288-bf670186bb62 | form_section:title | Application for TM&E Certificate Track |
| 379c2687-4ca8-4e5b-8588-fc4301c68f92 | form_field:title | What is your current profession? |
Note: After exporting content for translation, DO NOT make any changes to the track content on the platform until the translations have been successfully imported as described below. If you do so, you run the risk of overriding those changes during the import process.
Import Translations for Catalog Content, Application Form
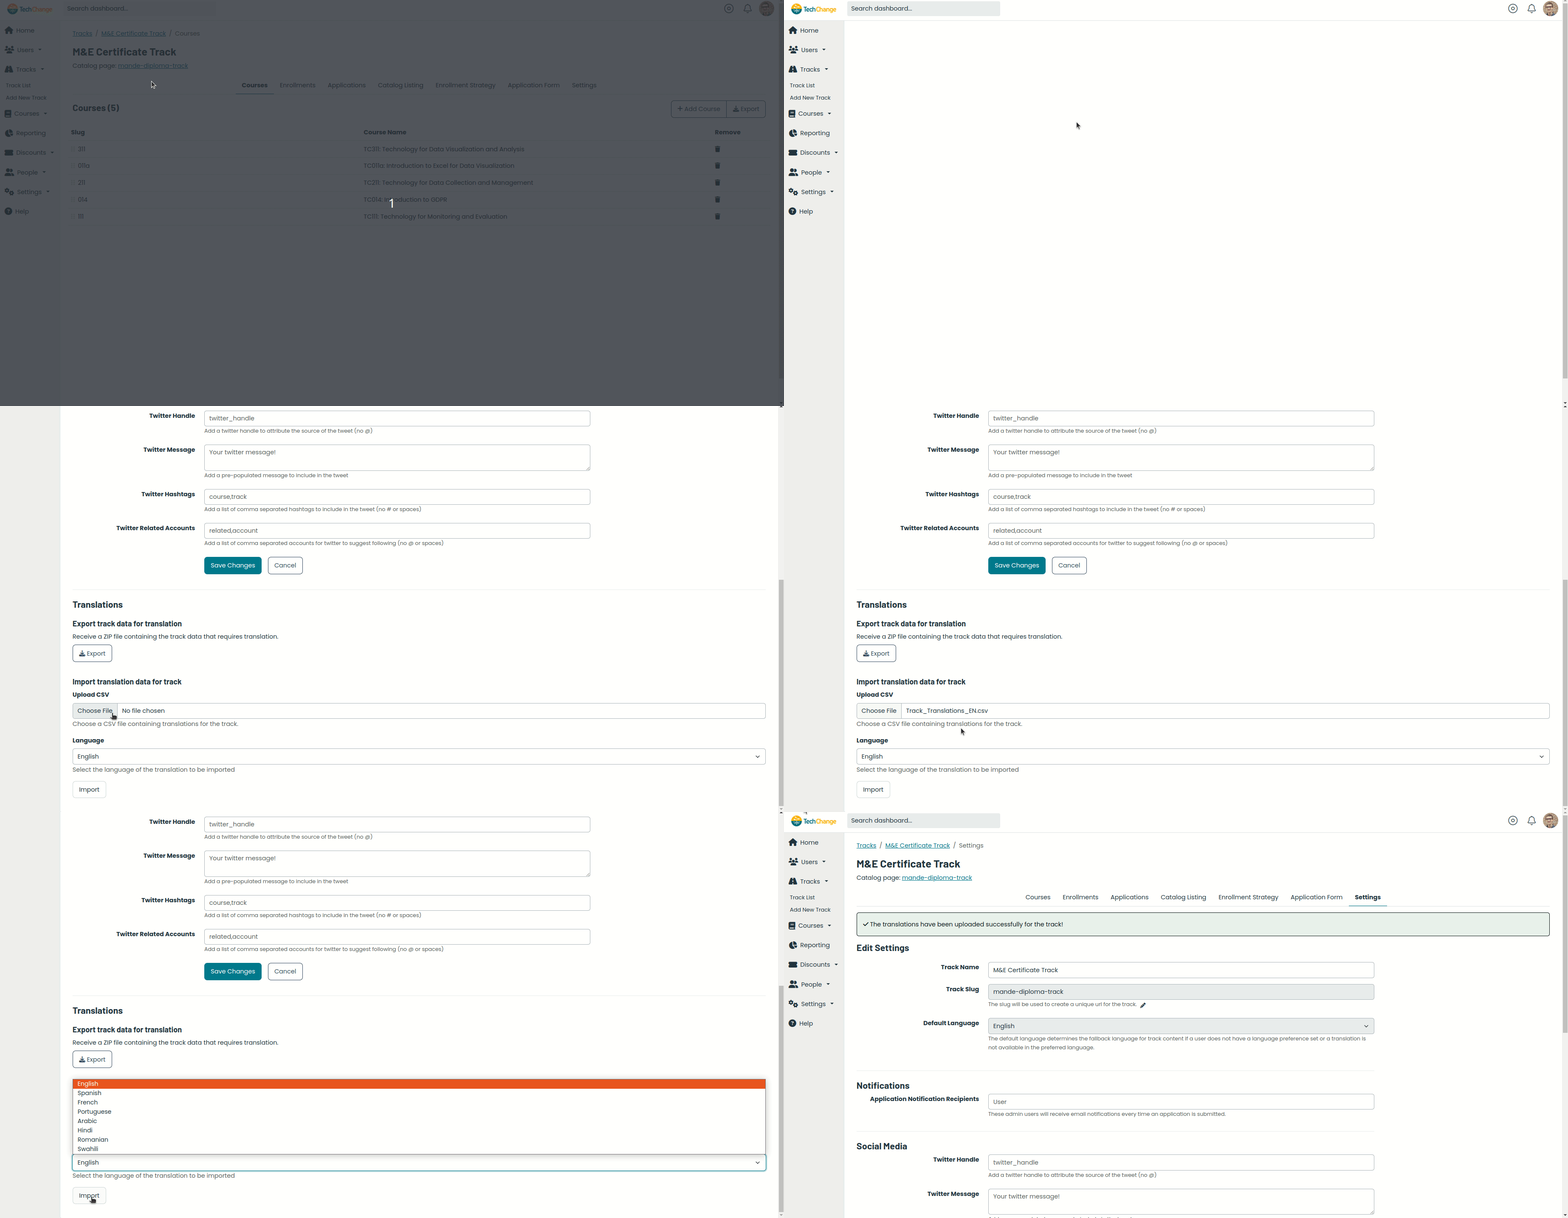
- After the CSV file has been updated to include the translated data for the
contentcolumn, navigate back to the Admin Portal page for the track (i.e. the page listing all courses). - Click on the Settings tab.
- Scroll down to find the Translations -> Import translation data for track section.
- Select the language of your translation from the Language dropdown.
- Click the Browse button.
- Navigate to the updated CSV file in your file browser and click to open.
- Click the Import button.
- Make sure your platform language is set to the language matching the imported translation and navigate to the catalog listing page. You should see the translated content.
Translating the Profile Form
Export Profile Form for Translation
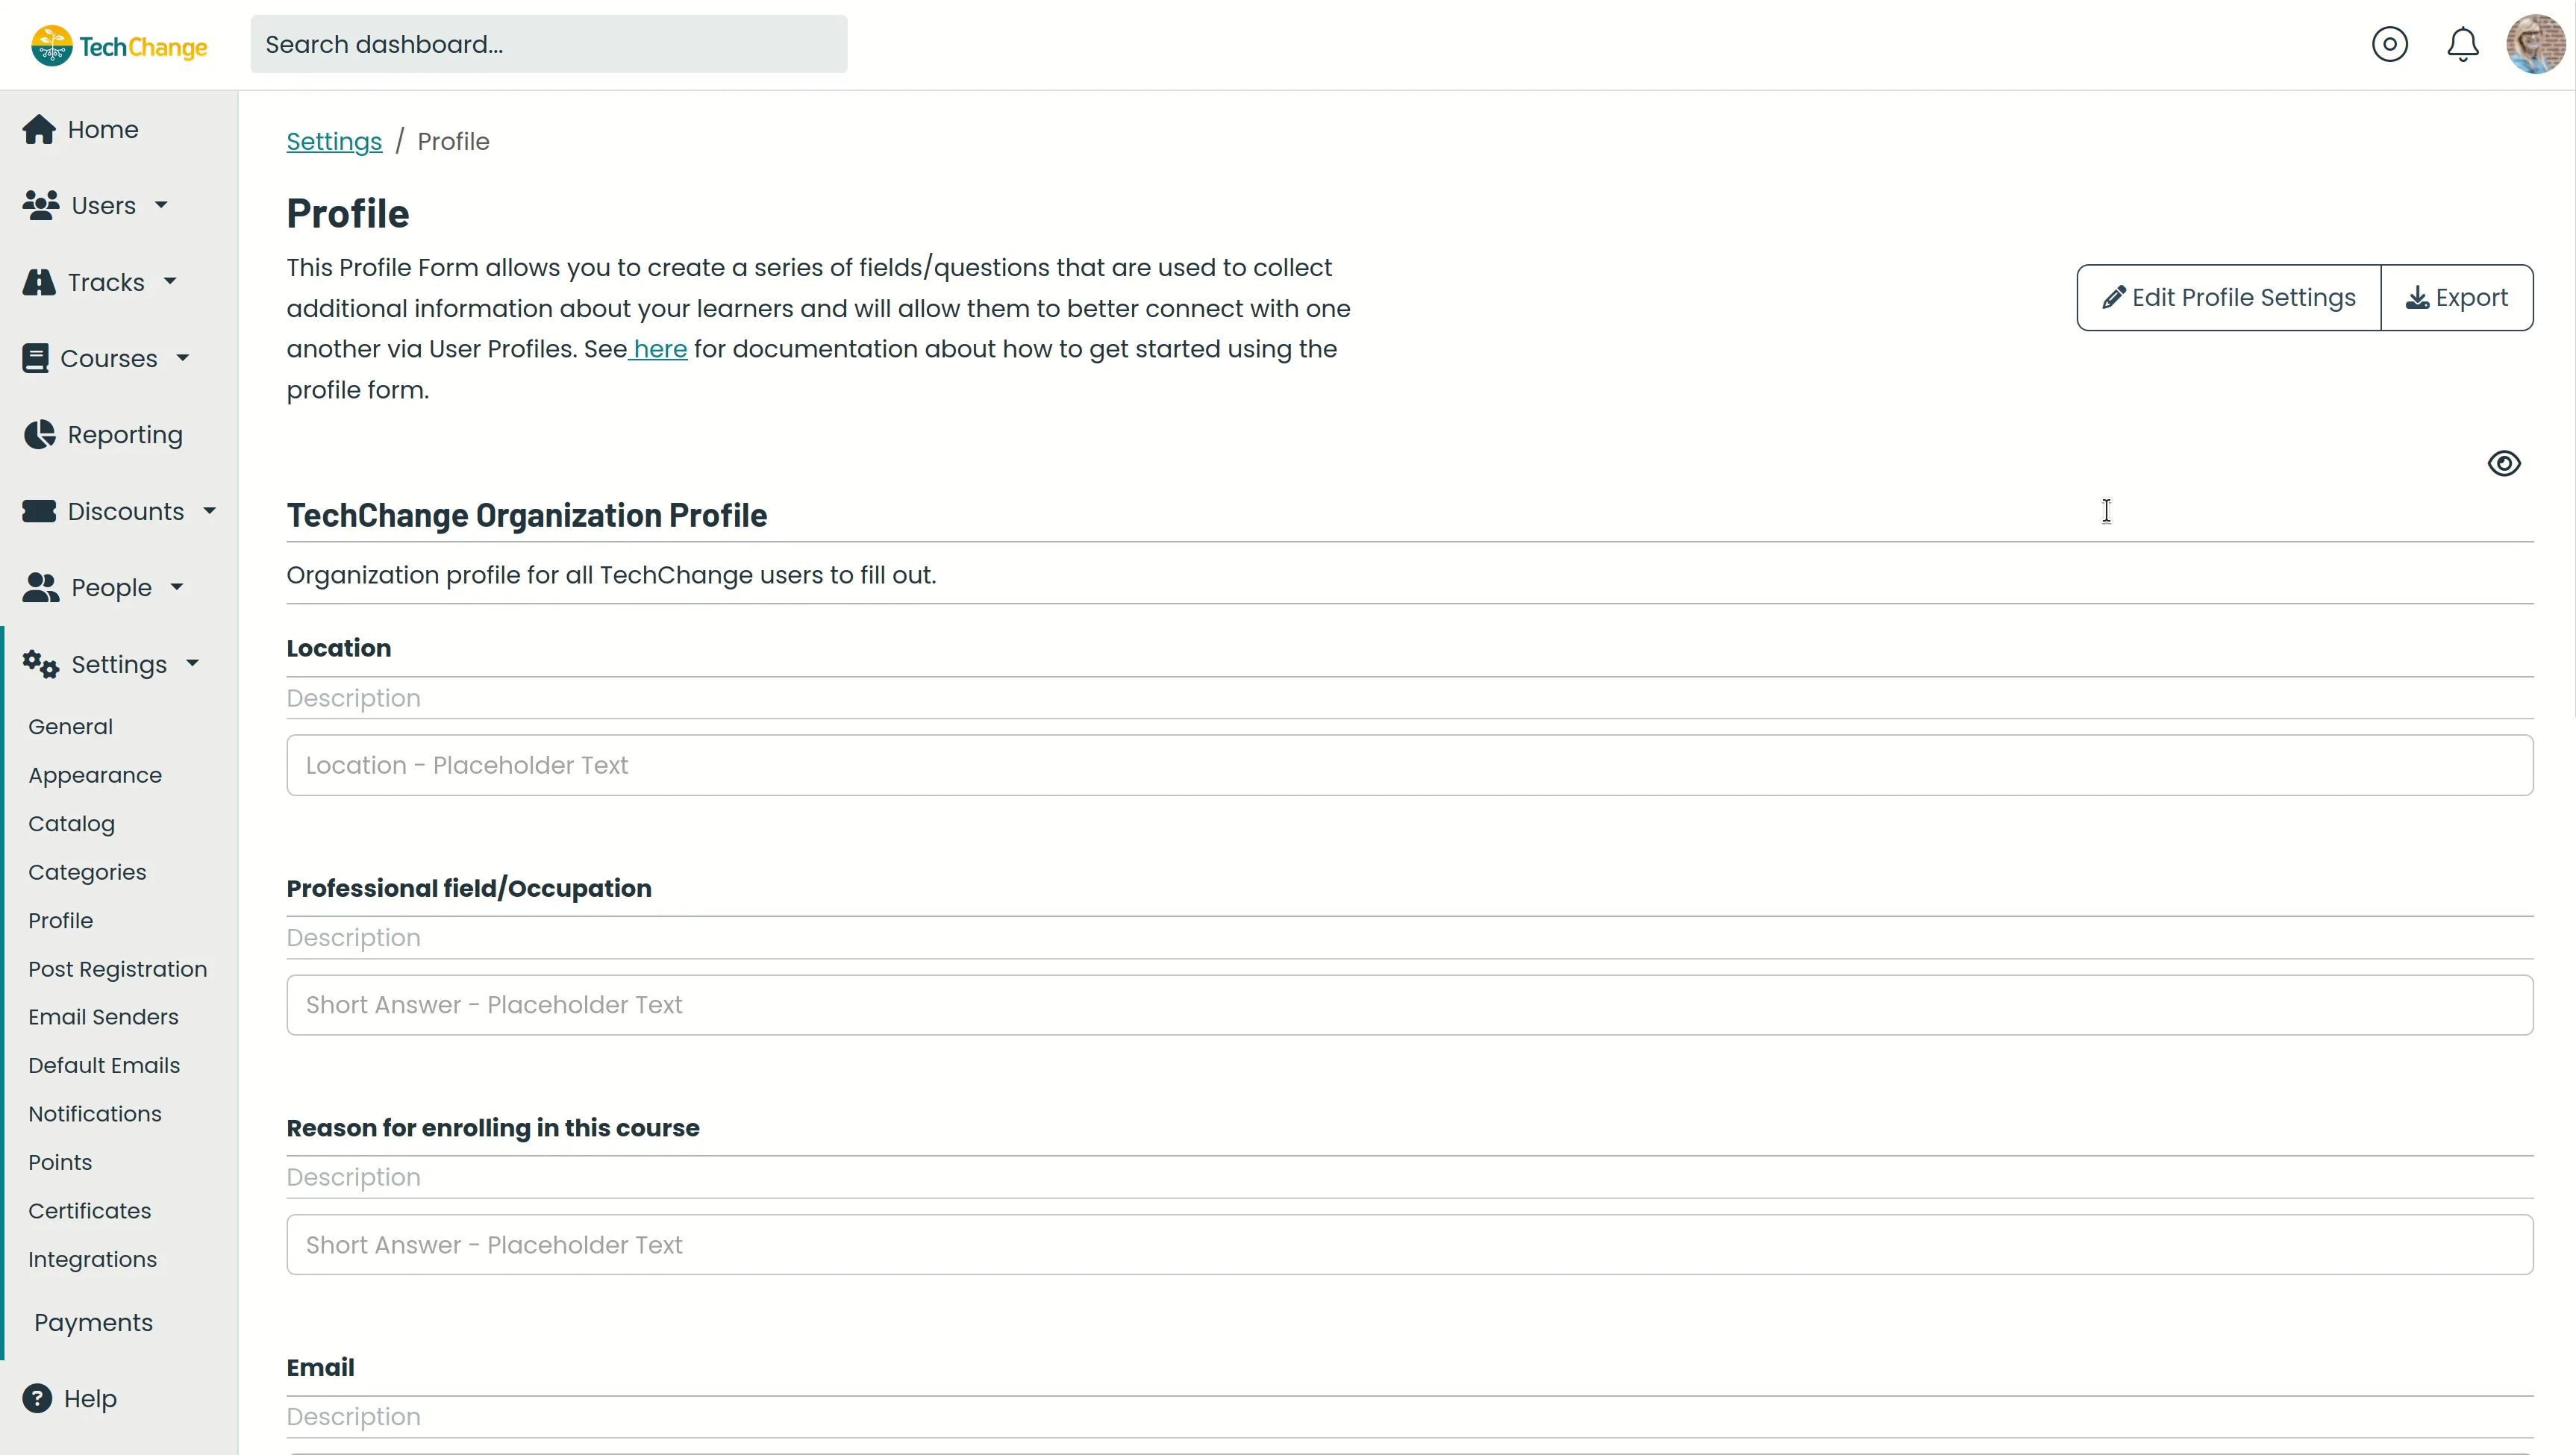
- Navigate to the Admin Portal page for the organization's profile form.
- Click the Export button on the right side of the page.
- Select the Profile Form Translations menu item.
- The CSV file,
Profile_Form_Translations_MM-DD-YYYY.csv, will be automatically downloaded to your computer. - The CSV file will contain 3 columns:
id,type, andcontent. The translation team should only make changes to thecontentcolumn. You CANNOT CHANGE the data in theidandtypecolumns. See example output below:
| id | type | content |
|---|---|---|
| 0ef7fdf0-8d1f-4118-bd83-63ace0702a89 | form:name | TechChange Organization Profile |
| 0ef7fdf0-8d1f-4118-bd83-63ace0702a89 | form:description | Organization profile for all TechChange users to fill out. |
| fcddadc0-8d97-4627-99ad-e1ab640f034e | form_field:title | Location |
Note: After exporting content for translation, DO NOT make any changes to the profile form content on the platform until the translations have been successfully imported as described below. If you do so, you run the risk of overriding those changes during the import process.
Import Translations for Profile Form
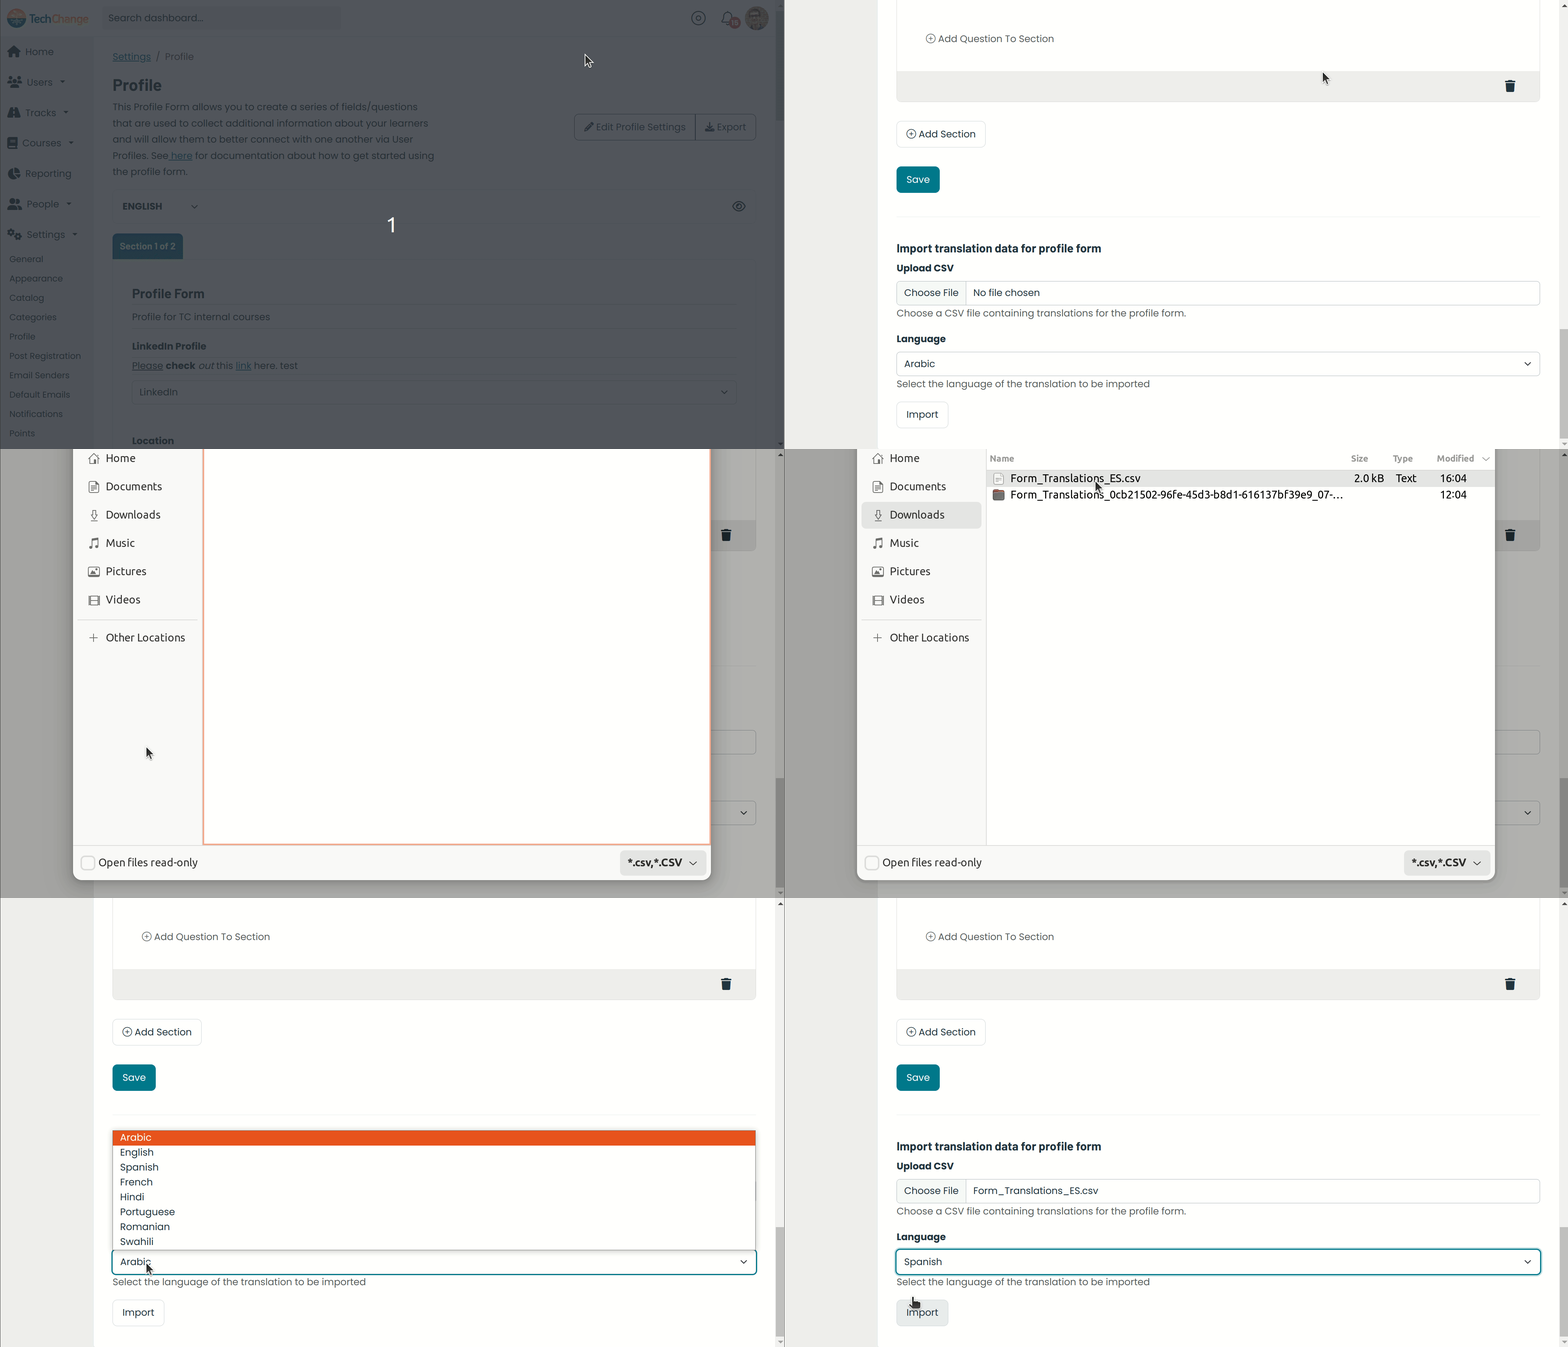
- After the CSV file has been updated to include the translated data for the
contentcolumn, navigate back to the Admin Portal page for the organization's profile form. - Scroll down to find the Translations -> Import translation data for profile form section.
- Select the language of your translation from the Language dropdown.
- Click the Browse button.
- Navigate to the updated CSV file in your file browser and click to open.
- Click the Import button.
- Make sure your platform language is set to the language matching the imported translation and navigate to your profile page. You should see the translated content.
Translating the Post-Registration Form
Export Post-Registration Form for Translation
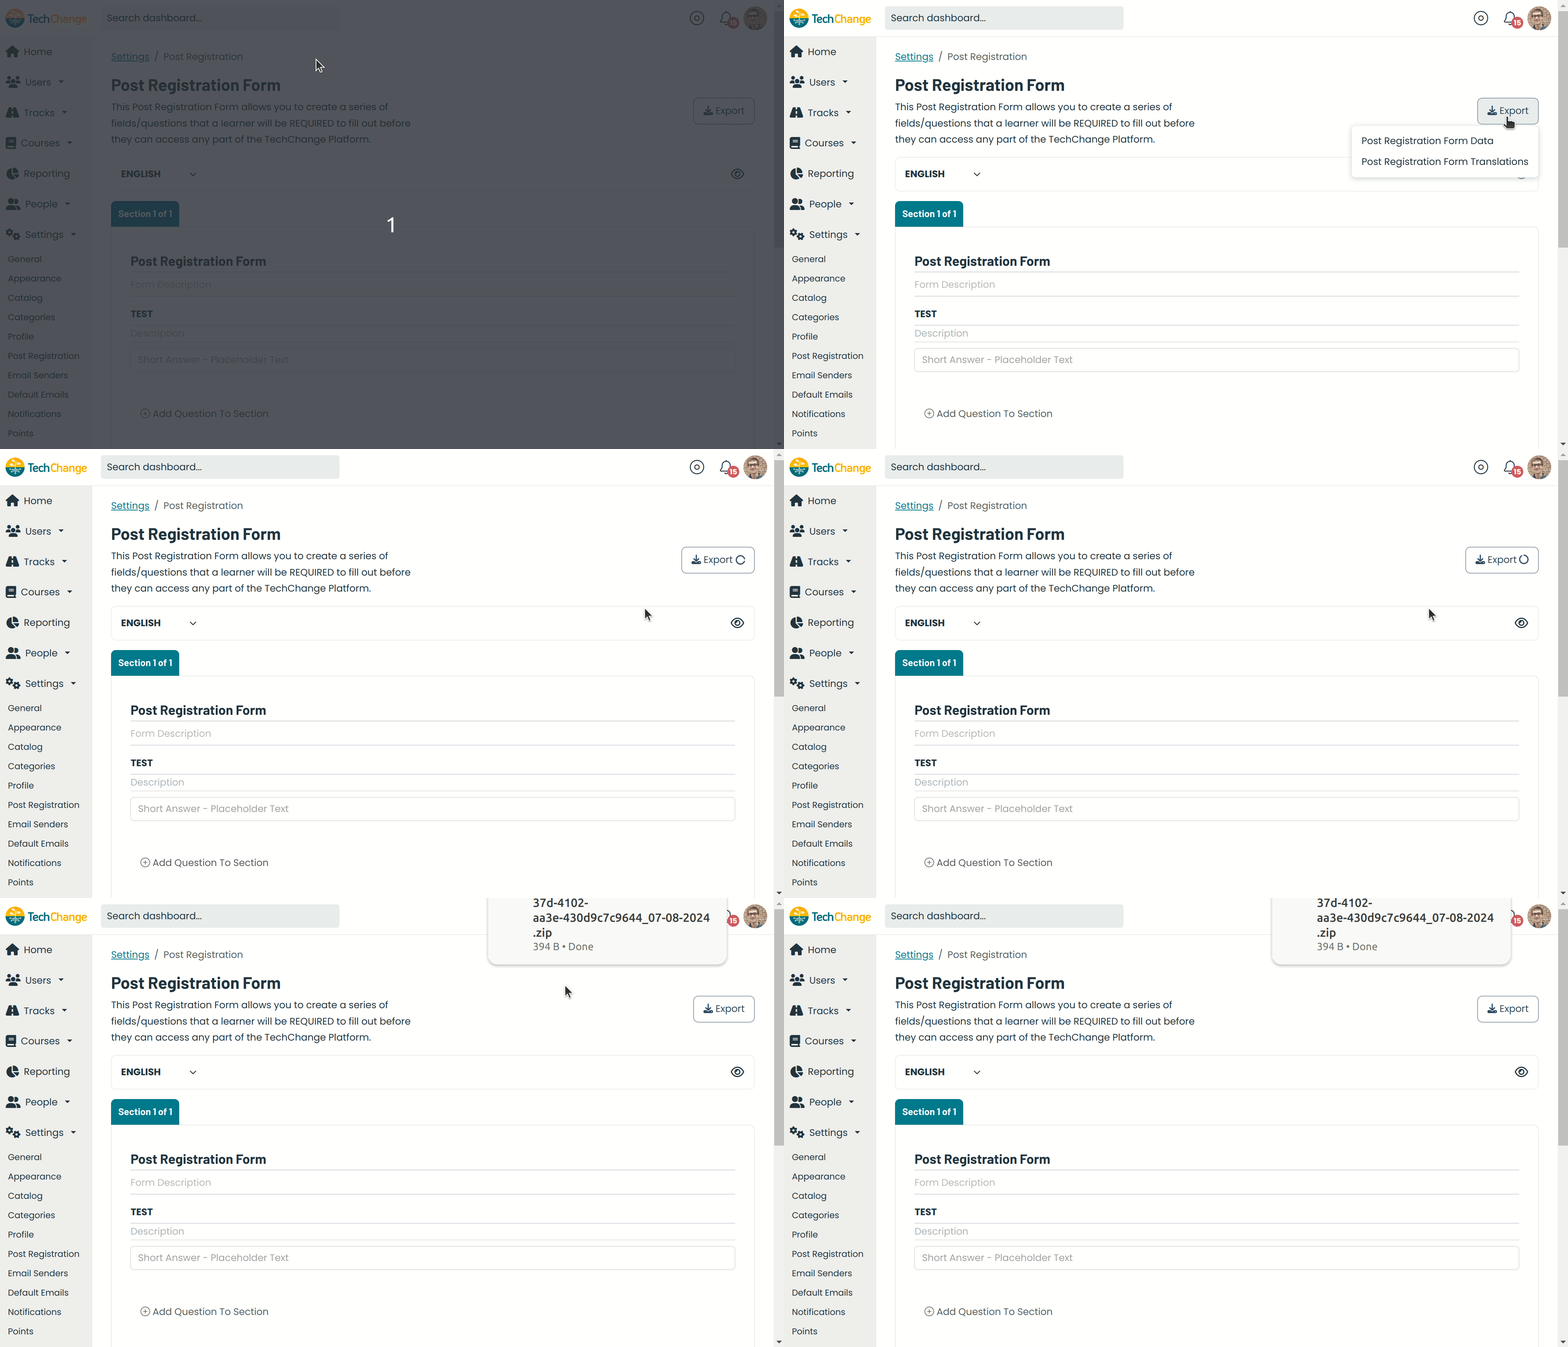
- Navigate to the Admin Portal page for the organization's post-registration form.
- Click the Export button on the right side of the page.
- Select the Post-Registration Form Translations menu item.
- The CSV file,
Post_Registration_Form_Translations_MM-DD-YYYY.csv, will be automatically downloaded to your computer. - The CSV file will contain 3 columns:
id,type, andcontent. The translation team should only make changes to thecontentcolumn. You CANNOT CHANGE the data in theidandtypecolumns. See example output below:
| id | type | content |
|---|---|---|
| 0ef7fdf0-8d1f-4118-bd83-63ace0702a89 | form:name | TechChange Post-Registration |
| 0ef7fdf0-8d1f-4118-bd83-63ace0702a89 | form:description | Post-registration form for all TechChange users to fill out. |
| fcddadc0-8d97-4627-99ad-e1ab640f034e | form_field:title | Where you are joining us from? |
Note: After exporting content for translation, DO NOT make any changes to the post-registration form content on the platform until the translations have been successfully imported as described below. If you do so, you run the risk of overriding those changes during the import process.
Import Translations for Post-Registration Form
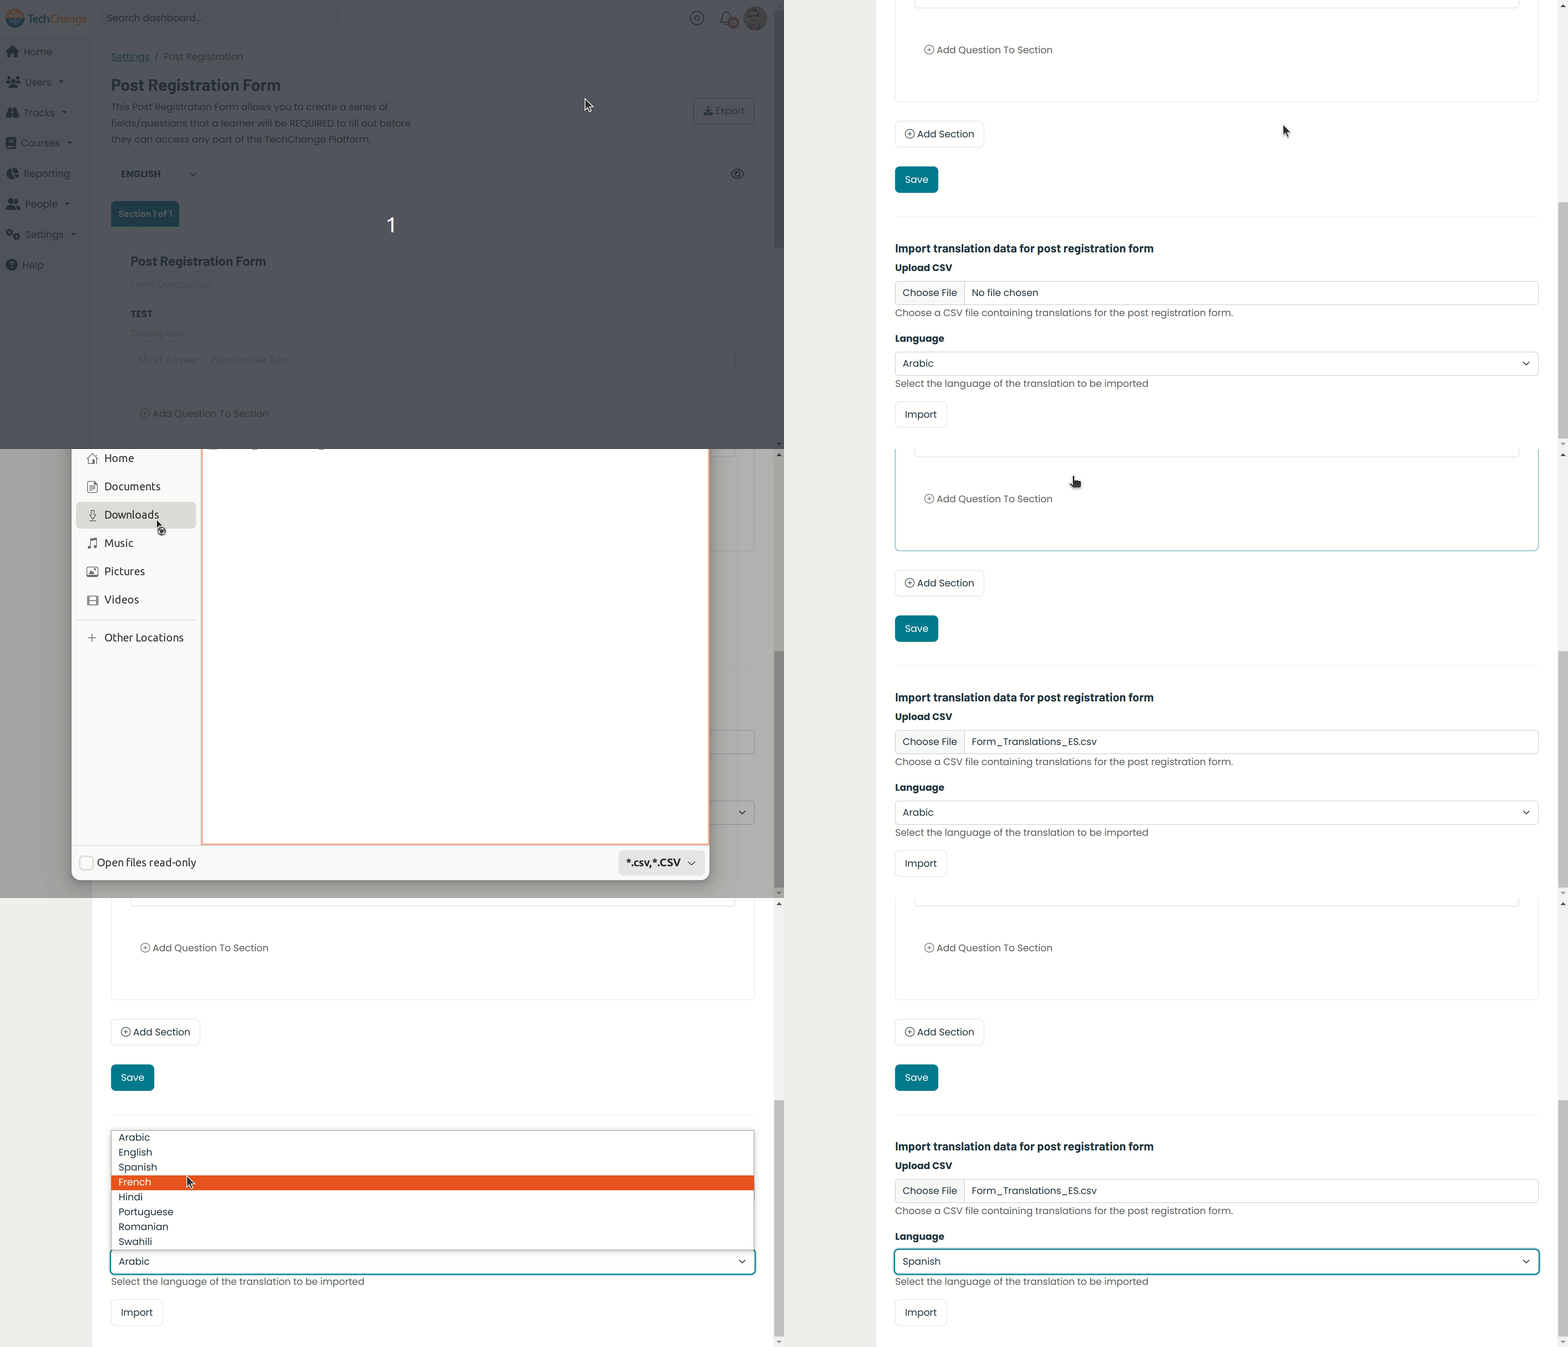
- After the CSV file has been updated to include the translated data for the
contentcolumn, navigate back to the Admin Portal page for the organization's post-registration form. - Scroll down to find the Translations -> Import translation data for post-registration form section.
- Select the language of your translation from the Language dropdown.
- Click the Browse button.
- Navigate to the updated CSV file in your file browser and click to open.
- Click the Import button.
- Make sure your platform language is set to the language matching the imported translation and navigate to the post-registration form on your settings page. You should see the translated content.